


I’ve been experimenting with different shapes and sizes in my scrapbook albums lately. For awhile now I’ve been mixing the traditional pages with the Project Life pages. It takes a lot of organizing to be able to do so if you are a chronological scrapbooker like myself. I use an In Progress album to help keep me straight since I don’t scrapbook chronologically despite organizing that way.

One way that I found helped when mixing traditional and pocket style scrapbooking by only using Design A pocket style pages such as in the picture above. By using this style only I knew that vertical photos were to be printed 3×4 and horizontal pictures were to be printed 4×6.
However, lately I’ve been loving the new Stampin’ Up! pocket page protectors – Variety Pack 2. There are three sizes including one 12×12, another 8×11 and another 6×12.

The picture above shows a couple more things. First, on the right you’ll notice some art that my child created for me. Often I will keep one piece out of every 50 or so and place it in a 8.5×11” page protector that I got some my local office supply store. It’s a great way to include your children’s art swimming certificates and report cards… I know what you are thinking… “this kid is a genius, that art is amazing.” And well, I couldn’t agree more! J

Second, on the left side of the album above notice there’s a traditional page. Well, this is actually just a divider in my mind. Simple is something better. With all the different sizes, my albums were beginning to look to busy and I started to introduce dividers same as a book would. I don’t always have pictures on them but this one does because it cracks me up. The divider is a piece of paper from the new 2015-16 Stampin’ Up! Designer Series Neutral stack. Photo credit goes to White Willow Photography.

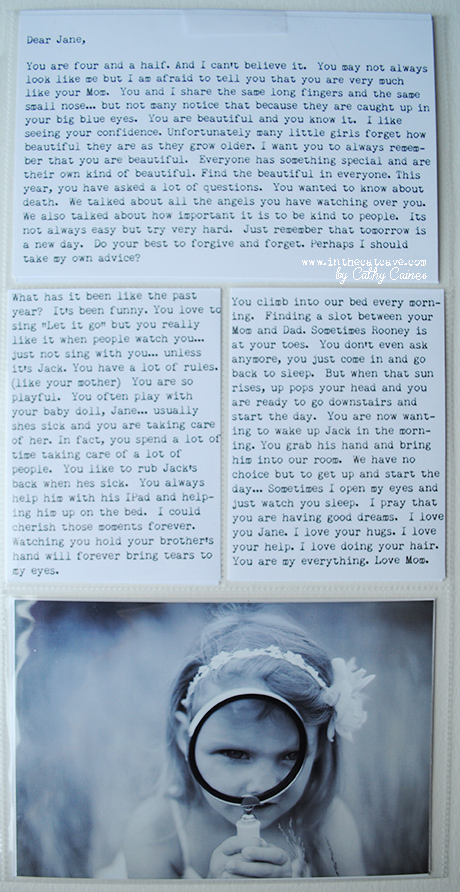
Back to the different sizes – here’s a 6×12” layout that is essentially a note to my daughter. On the other side, I have a note to my son. The notes describe my feelings for them but also what they doing at the age they are in the photos. I imagine these notes will be very important to my children later on. Note: Photo credit goes to White Willow Photography.
Here’s a 8×12” where by I cut the edge of the 12×12 off because I didn’t have enough photos. The pages began to blend in as it sat in my album so instead of using a divider as I did above, I added a tab. This made it easier to flip through the album.

Alright… you caught me. I made a mistake in my cutting and had to sew the edges together. This 12×12 page protector is actually part of the new variety package of page protectors that Stampin’ Up! released in July. I love the 2×2 squares! This layout shows some of the 2×2 cards available in the Happy Times Project Life ™ accessory kit.

This Project Life ™12×12 layout includes a glassine bag that I created to fit into the pocket using the Mini Treat Bag framelit and the glassine sheets from Stampin’ Up! I cut down the foil lined 3×4 card to lay on top of the bag inside the pocket. In addition, you’ll notice that I wrote directly onto my photo of the coffee mug. Whenever there’s white space within a photo, it can allow you to journal directly onto the photo using a photo signature pen.

The back side of the above layout includes the everyday chaos of the Caines family. I used the washi tape from the Moments Like These Project Life ™ card collection from Stampin’ Up!

Another way to incorporate your children’s artwork is to cut it down into pocket sizes. Although its not on archival paper, at least its protected inside the pocket.

Finally, towards the end of this part of my album, I have a pocket envelope, which has a little slot where you can put a 3×4 card or photo. I am saving this little pocket for my daughter’s preschool popsicle stick crafts. I try to limit these envelopes as they bulk up my album. Stampin’ Up! sells the 6×8” envelopes in packs of two and they are great quality.

Did you think this post would never end? (Well, you would be wrong!)
This was just a little glimpse into my current scrapbook album and my current style. I’d love to see how you are incorporating different sizes and different styles of Project Life ™ into your own albums. Be sure to tag Canadian Scrapbooker Magazine and myself @ In the Cat Cave so we can share your creations!
Cathy Caines, Independent Stampin’ Up! Demonstrator, St. John’s NL
Visit Cathy’s blog www.inthecatcave.com
Supplies used are Stampin’ Up! unless otherwise stated: Project Life ™ page protectors variety packs 1 & 2, Project Life ™ Moments Like These card and accessory kits, Project Life ™ grid cards, Project Life ™ Happy Times card and accessory kits, Project Life ™ envelopes, Project Life ™ journaling pens, gold foil, Project Life ™ clip framelits, Moments Like These stamp set, calypso coral ink, vintage tea doily, Neutrals Designer Series Paper pack, Greetings thinlit, Mini Treat Bag framelit, 1” circle punch, glassine sheets, Momentum ink, stapler, machine stitching.


Comments
So creative and a delight to peruse. Well done and I especially loved the comments to your daughter, she will cherish them forever.