


Hello everyone! Kerry Engel here today on the Creative Scrapbooker Magazine Blog!  I’ve been looking at stamps differently lately. I like to see if there are ways that I can deconstruct the different design elements so that I can cut it apart and create layers.
 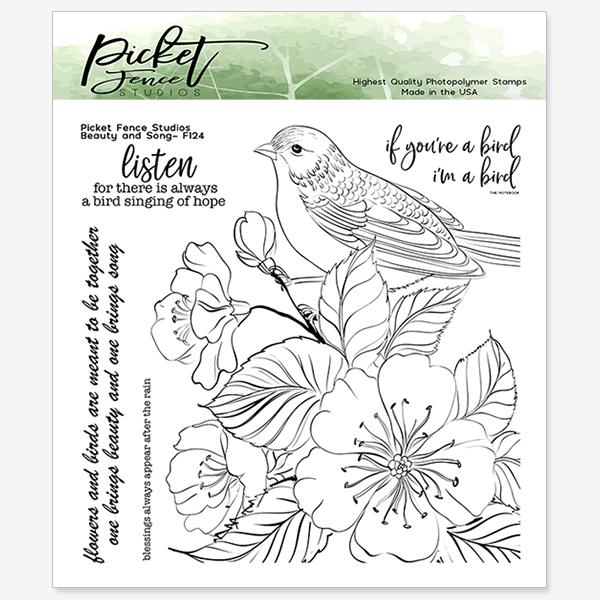 The Beauty and Song stamp by Picket Fence Studios is a stamp that has a lot of opportunities to go a bit crazy with layers. Here’s how I put this one together.
Step 1. Stamp the image on cardstock and use the Brother ScanNCut to precisely cut the stamped image from the cardstock.
TIP: This stamp has some open ends. The Brother ScanNCut scans the outside edge and requires a black edge. The opened-ended leaves on this stamp needed to be closed in. The Brother ScanNCut did an amazing job of cutting out this complex stamp. I was suitably impressed with how it cut perfectly along the edges of the design.  Step 2
Re-stamp large flower on a scrap piece of cardstock, colour and cut out the flower. Trace edges with a black pen, cover with Ultra Thick embossing powder and add dots with Ranger Wendy Vecchi Liquid pearls in Orange Blossom.  Step 3
Color your stamped image. Add white dots with a Sakura Gelli Roll pen to create highlights. Retraced the lines of the feathers with a black pen to make them stand out.
Step 4  Blend Ranger Tim Holtz Distress Oxide inks on Creative Scrapbooker Super Stock.
 I like to blend with the Picket Fence Studios Life Changing Blender Brushes. Add circles and dots to the background paper using a Gelliroll gold pen and emboss with a Sizzix embossing folder. Blend the Gelli roll pen along the edges to add some gold to the edges of the paper.
Step 5
Assemble the card. Use Scrapbook Adhesives by 3L 3D Foam Squares and Crafty Foam Tape to mount the stamped image onto the embossed paper. Stick gold thread in behind the stamped image before you adhere the image. Adhere the second flower with Scrapbook Adhesives by 3L 3D Foam Squares on top of the stamped image. Apply a sentiment.
  A layered card is a piece of art. It turns into something that people display for a very long time. Sometimes I forgo a sentiment because they work as stand-alone objet d’art!
Have a wonderful Thursday everyone!

Supplies:
Picket Fence Studios: Beauty and Song Stamp and Life Changing Blender Brushes
Brother ScanNCut
Ranger: Tim Holtz Distress Oxide inks, Ultra thick embossing powder, Wendy Vecchi Liquid Pearl in Orange Blossom
Scrapbook Adhesives by 3L – 3D Foam Squares and Crafty Foam Tape
Creative Scrapbooker Magazine Super Stock
Sakura Gelli Roll pens in white and gold
Sizzix embossing folder
Kerry is a MORNING crafter! Every morning before she heads off to work she takes some time in her craft room. Once or twice a week she shares what she has been working on, within the Creative Scrapbooker Magazine Instagram Stories. Be sure to follow us on Instagram so you won’t miss what is cooking at Kerry’s house! CLICK HERE 


2 Comments
This is gorgeous!
Thank you Roni