fbpx
Creative Scrapbooker Magazine's Village of Inspired People promotional image featuring a collage of industry experts and instructors. The black background is decorated with daisies, and text highlights 'Join Now & Boost Your Creativity,' '43+ Classes Available Now,' 'Intimate, Interactive Online Classes,' and '100+ Live Demos & Printable Step-by-Step PDFs.' The main image features smiling individuals ready to teach creative classes.


Hey there everyone! Cathie Allan here today sharing with you one of my articles from the Summer 2016 issue of Creative Scrapbooker Magazine – Creating Faux Mini-Canvases. I know you are going to LOVE IT!

Faux Mini-Canvases
by Cathie Allan
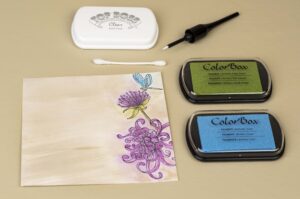
In this issue, we are going to create “faux mini-canvases.” This special combination of background colours and the way we apply the ink layer after layer will totally have you thinking that we worked on canvas. In reality, we have simply worked on Creative Scrapbooker Super Stock—the cardstock of my inking and rubber stamping dreams. We are using pigment ink—the most light-fast stamping medium there is—so you will be able to enjoy them for a long, long time.

Creating a Faux-Canvas | Featuring Impression Obsession, Heartfelt Creations and Clearsnap | Designed by Cathie Allan | Creative Scrapbooker Magazine
SUPPLIES: Creative Scrapbooker Super Stock, Clearsnap ink, stylus, white foam tips, Smooch tip and Top Boss embossing ink, Heartfelt Creations stamps and coordinating dies, Impression Obsession sentiment stamp, Scrapbook Adhesives by 3L.

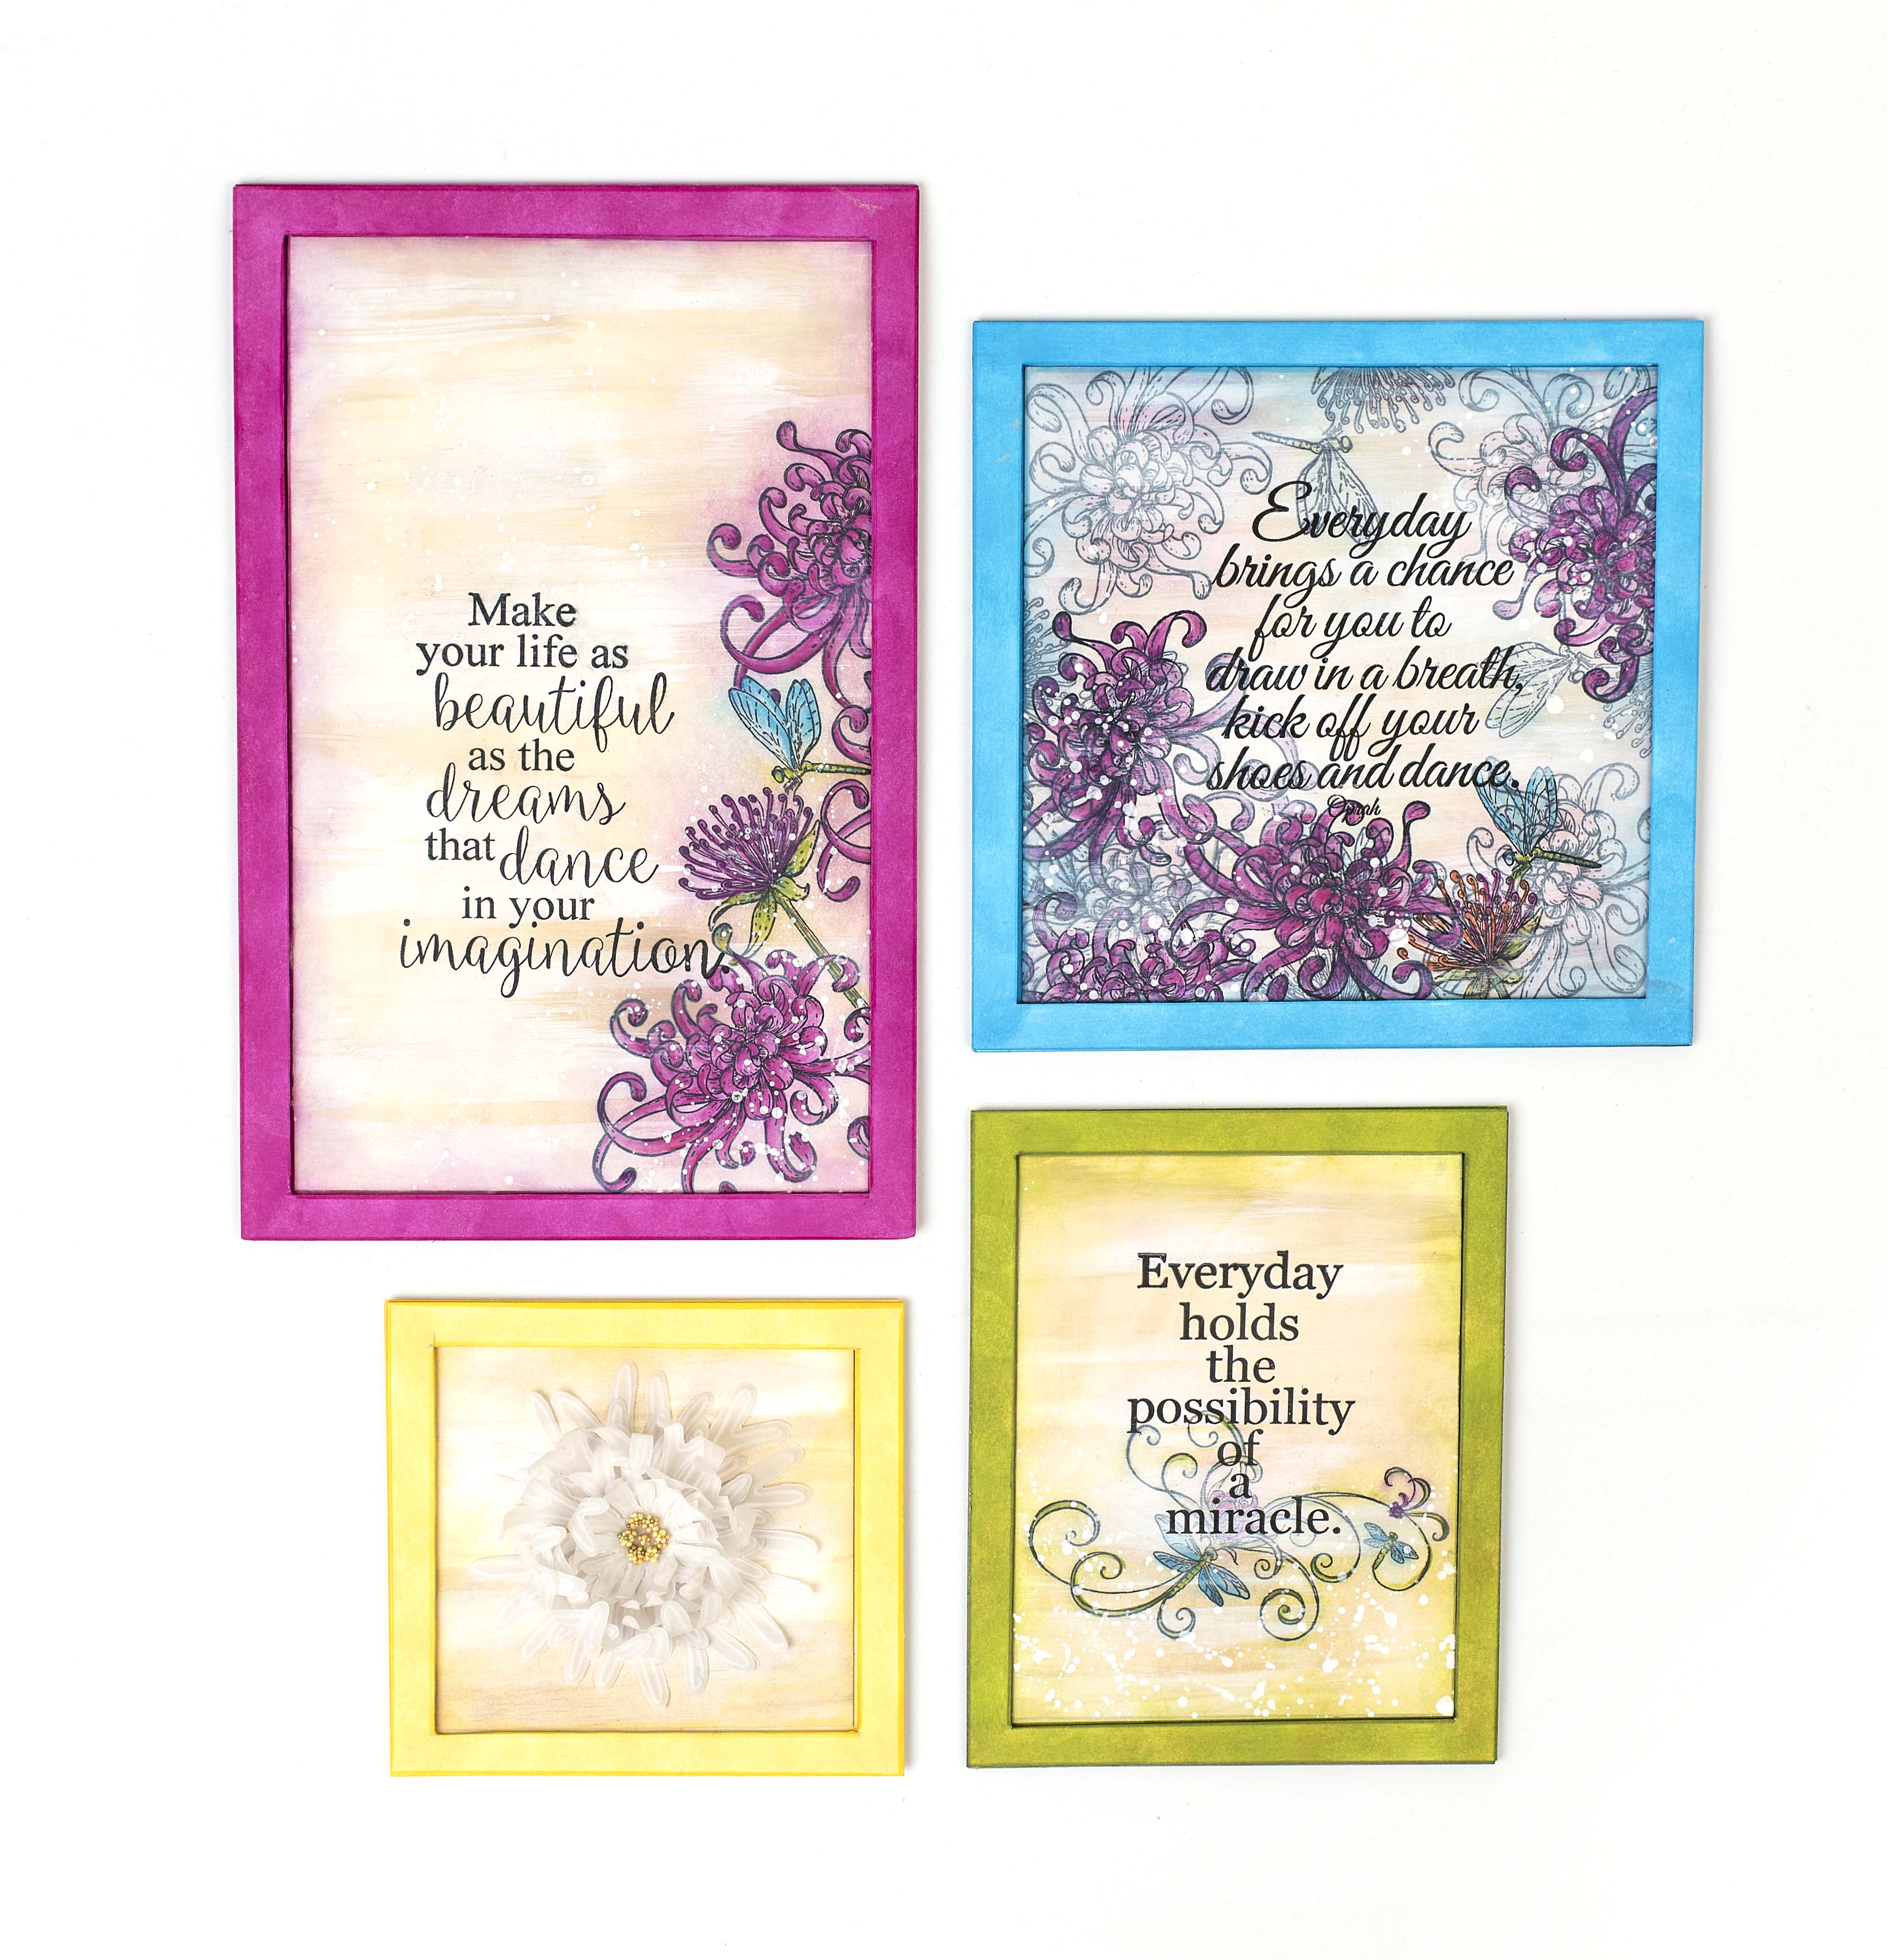
I invite you to use the techniques we are stepping out for you today on your favourite craft project—a card, a scrapbook page, a knock-out art journal page or any crafting project your inky heart has a mind to try.

Instructions

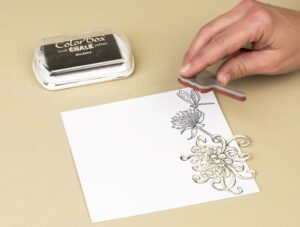
  1. Create a mask out of the Heartfelt Creations stamp.

    Creating a Faux-Canvas | Featuring Impression Obsession, Heartfelt Creations and Clearsnap | Designed by Cathie Allan | Creative Scrapbooker Magazine
    Step One
  2. Using Clearsnap ColorBox Fluid Chalk ink, stamp Heartfelt Creations stamp down the right hand side of a piece of Creative Scrapbooker Super Stock, masking as you go.
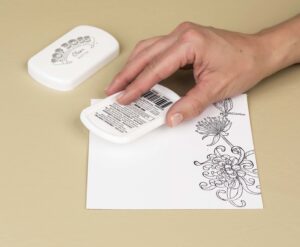
    Creating a Faux-Canvas | Featuring Impression Obsession, Heartfelt Creations and Clearsnap | Designed by Cathie Allan | Creative Scrapbooker Magazine
    Step Two
  3. Apply a good coat of Clearsnap Top Boss over the entire panel.
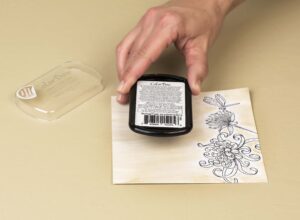
    Creating a Faux-Canvas | Featuring Impression Obsession, Heartfelt Creations and Clearsnap | Designed by Cathie Allan | Creative Scrapbooker Magazine
    Step Three
  4. Use a burlap-coloured pigment ink pad from Clearsnap that is full of ink. Pull the pad across the panel, causing streaks. Stop before your stamped design.

    Creating a Faux-Canvas | Featuring Impression Obsession, Heartfelt Creations and Clearsnap | Designed by Cathie Allan | Creative Scrapbooker Magazine
    Step Four
  5. Using a stylus and Q-tip, fill in areas that were missed, staying away from the stamped image.
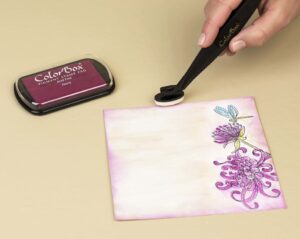
    Creating a Faux-Canvas | Featuring Impression Obsession, Heartfelt Creations and Clearsnap | Designed by Cathie Allan | Creative Scrapbooker Magazine
    Step Five
  6. Using a Clearsnap Smooch Accent tip and peony pigment ink, begin colouring from the outside in.

    Creating a Faux-Canvas | Featuring Impression Obsession, Heartfelt Creations and Clearsnap | Designed by Cathie Allan | Creative Scrapbooker Magazine
    Step Six
  7. Stretch the colour with a cotton Q-tip that has been dipped in a Top Boss ink pad. The colour can go outside the lines.

    Creating a Faux-Canvas | Featuring Impression Obsession, Heartfelt Creations and Clearsnap | Designed by Cathie Allan | Creative Scrapbooker Magazine
    Step Seven
  8. Repeat Step 7, using cyan pigment ink for the dragonfly and moss pigment ink for the leaves.

    Creating a Faux-Canvas | Featuring Impression Obsession, Heartfelt Creations and Clearsnap | Designed by Cathie Allan | Creative Scrapbooker Magazine
    Step Eight
  9. Add more peony ink to the blossoms where you would like the blossoms to be darker. Work from the outside in.

    Creating a Faux-Canvas | Featuring Impression Obsession, Heartfelt Creations and Clearsnap | Designed by Cathie Allan | Creative Scrapbooker Magazine
    Step Nine

Scraps of Info
When applying peony ink for shading with your Clearsnap Smooch tip, if you apply too much in an area simply use a Q-tip loaded with Top Boss to erase.

  1. Iron to heat set between two pieces of clean newsprint.
  2. Using a stylus and white foam tip loaded with espresso pigment ink, add a few streaks of colour to the panel. Soften with a paper towel.

    Creating a Faux-Canvas | Featuring Impression Obsession, Heartfelt Creations and Clearsnap | Designed by Cathie Allan | Creative Scrapbooker Magazine
    Step Ten
  3. Using a stylus and white foam tip loaded with frost white pigment ink, apply a few streaks of colour to the panel. Again soften with a paper towel.

    Creating a Faux-Canvas | Featuring Impression Obsession, Heartfelt Creations and Clearsnap | Designed by Cathie Allan | Creative Scrapbooker Magazine
    Step Eleven
  4. Using a stylus and white foam tip loaded in peony pigment ink, add shading around the edges. Soften with a white foam tip loaded with Top Boss.

    Creating a Faux-Canvas | Featuring Impression Obsession, Heartfelt Creations and Clearsnap | Designed by Cathie Allan | Creative Scrapbooker Magazine
    Step Twelve
  5. To heat set, iron between two pieces of clean newsprint.
  6. Use black pigment ink to stamp the Impression Obsession sentiment onto the panel.

    Creating a Faux-Canvas | Featuring Impression Obsession, Heartfelt Creations and Clearsnap | Designed by Cathie Allan | Creative Scrapbooker Magazine
    Step Thirteen
  7. Use your sentiment stamp and a Post-It note to create a mask.

    Creating a Faux-Canvas | Featuring Impression Obsession, Heartfelt Creations and Clearsnap | Designed by Cathie Allan | Creative Scrapbooker Magazine
    Step Fourteen
  8. Cover your sentiment on the panel with the mask. Apply a small amount of frost white pigment ink from a re-inker onto a non-stick surface. Spritz with water. Pick up the ink with a paintbrush. Bang the brush on your finger as you add controlled splatters of frost white pigment ink onto your project.

    Creating a Faux-Canvas | Featuring Impression Obsession, Heartfelt Creations and Clearsnap | Designed by Cathie Allan | Creative Scrapbooker Magazine
    Step Fifteen
  9. Allow to dry, or heat set with a heat gun.
  10. Cut out three panels from Super Stock the same size and the original panel. On two of the panels, cut out a 3/8th-inch frame. Apply peony ink on both pieces.
  11. On the third solid panel, apply peony ink along the border.

    Creating a Faux-Canvas | Featuring Impression Obsession, Heartfelt Creations and Clearsnap | Designed by Cathie Allan | Creative Scrapbooker Magazine
    Step Sixteen
  12. Adhere your panel created in Step 18 to the third piece of Super Stock created in Step 21.
  13. Next, adhere the two frames created in Step 20 to the top of the panel created in Step 22.

Each and every issue of Creative Scrapbooker Magazine I will share with you either a complete step by step project using my inky tools – in my It’s All About Rubber article or a project featuring my favourite tools of choice – in my Cathie’s Choice column.  You really need to subscribe!

Cathie Allan headshot for Creative Scrapboooker Magazine
Cathie Allan

Subscribe today to Creative Scrapbooker Magazine – HOLD IT! READ IT! LOVE IT!

Creative Scrapbooker Magazine


Author


Write A Comment

2 Comments

February 15th/25

WATCH THE REPLAY: CLICK HERE

Zoom Crop Information PDF: CLICK HERE

FREE Layout Template Guide: CLICK HERE

VIP Zoom Crop

Friday January 17th Zoom Meeting:
Link to replay: CLICK HERE

Saturday January 18th Zoom Meeting:
Link to replay: CLICK HERE

December 30/24 Online Class

CLICK HERE for the Link for Your Crafty Homework

This includes the eBook and printable materials for the class.
Please note: You’ll need to provide your email address, as Nadine Milton will send the information directly to you.

CLICK HERE for the Link for the Information PDF

This includes the supply list for this class.

VIP Zoom Crop
Friday November 8th: 7:00pm - 10:00pm MST
Saturday November 9th: 10:00am - 10:00pm MST

You will need the ZOOM App on your computer or phone.

Nov 8th - Friday Night
Topic: Zoom Crop #43 - ArtFest hosted by Dooreen Rousseau - FRIDAY NIGHT!
Time: Nov 8, 2024 07:00 PM Mountain Time (US and Canada)
Link: https://us06web.zoom.us/j/87256071707?pwd=F7077MJSL1JLNEK7CMXygrHC0hVAlw.1
Meeting ID: 872 5607 1707
Password: 309205

Nov 9th – Saturday
Topic: Zoom Crop #43 - ArtFest Hosted by Dooreen Rousseau - SATURDAY
Time: Nov 9, 2024 10:00 AM Mountain Time (US and Canada)
Link: https://us06web.zoom.us/j/87925186090?pwd=EEPjhi54pyB6YQ3olyaJaYggcGRGxP.1
Meeting ID: 879 2518 6090
Password: 222409

Zoom Crop Information PDF: CLICK HERE

July 12, 2024 - Zoom Crop

WATCH THE REPLAY: CLICK HERE

Here are the times of the demos
1:12:07 - Demo - Page Builders Club House with Tracy Pounds
Here is the PDF link for Tracy's demo with the instructions and products she used: CLICK HERE

3:03:27 - Demo – Infinity Crafts with April Floriant

Thanks so much to everyone who joined and hope to see you all again on Friday, August 9th – from 10:00am to 2:00pm MDT.

July 24/24 Online Class

View the Class Video: Click Here

View the Info PDF: Click Here

Link to purchase the Craft Along Kit: Click Here

April 30/24 Online Class


View the Info PDF: Click Here

Link to purchase the Craft Along Kit: Click Here

December 9/23 Zoom Crop

8 Hour Zoom Crop: Click Here

After Hours Zoom Crop: Click Here

September 27th/23 Online Class


View the Info PDF: Click Here

Link to purchase the Craft Along Kit: Click Here

This website uses cookies to ensure you get the best experience on our website. Learn more

VIP Zoom Crop
Firday May 9th: 7:00pm - 10:00pm MST
Saturday May 10th: 10:00am - 10:00pm MST
Theme: ART FEST

You will need the ZOOM App on your computer or phone.

Zoom link will appear here on your designated crop day!