


Hey Creative Scrapbooker Fans! For today’s blogpost, I’m sharing with you how to create this These Are the Days Mini Album which uses the Summer Lovin’ Collection from Simple Stories Dies from Elizabeth Craft Designs
  And adhesive from Scrapbook Adhesives by 3L.
  You’ll want to grab a cup of your favourite beverage and learn how to recreate my mini album at home.
  To start, you’ll need the Sweet Summertime patterned paper out of the Summer Lovin’ Paper Pack from Simple Stories. Die cut a 4 1/2” Stitched Fishtail from Elizabeth Craft Designs out of the patterned paper. Take out the tight yellow plaid out of the 12×12 Basics Kit – Summer Lovin’ from Simple Stories. Die cut a 3 ½” Stitched Fishtail from Elizabeth Craft Designs out the patterned paper. Distress the edges of both pieces.
  Next, you’ll need the Journal Elements patterned paper out of the Summer Lovin’ Paper Pack from Simple Stories. Cut out the sun journal element. Distress the edges of the journal element.
  Fussy cut two leaves, four single flowers and three flower bunch from the Simply Paradise patterned paper out of the Summer Lovin’ Paper Pack from Simple Stories.
  Next, you’ll need the rainbow label and Sunshine Vibes tab out of the Summer Lovin’ Journal Bits from Simple Stories. Distress the edges of the rainbow label.
  The last elements, you’ll need are the pink arrow and Umbrella with bucket out of the Summer Lovin’ Bits & Pieces from Simple Stories.
  Use E-Z Runner Adhesive from Scrapbook Adhesives by 3L to adhere the sun journal element to the left-hand side of the yellow plaid fishtail. Make sure ¼” is sticking out. Adhere the sunshine vibes tab to the top portion of the yellow plaid fishtail as desired. Use 3D Foam Squares from Scrapbook Adhesives by 3L to adhere the yellow plaid fishtail 3/8” from the bottom and ¼” from the left of the floral side of the 4 ½” fishtail. Adhere the pink arrow to the top right side of the rainbow label. Adhere the rainbow label 5/8” from the bottom and 3/8” from the left of the yellow plaid fishtail. Adhere the flowers as desired in the top left corner of the rainbow label. Use 3D foam squares to adhere the umbrella with bucket to the bottom right side of the rainbow label as desired. Off the Summer Lovin’ Foam Stickers from Simple Stories, you’ll need the These are the Days word sticker. Stick the word sticker to the middle of the rainbow label. Adhere the sunshine, good times word strip out of the Summer Lovin’ Sticker Book from Simple Stories underneath the These are the Days word sticker. Choose four enamel dots off the Summer Lovin’ Enamel Dots from Simple Stories and adhere around the These Are the Days word sticker. Off the Summer Lovin’ Decorative Brads from Simple Stories, you’ll need three of the small brads. Adhere one brad in the top right corner of the yellow plaid fishtail and the other two in the bottom left corner of the yellow plaid fishtail.
  Flip the front cover over. We will now be working on the dotted side of the fishtail.
  Choose one of the squares off the 2×2/4×4 Elements patterned paper out of the Summer Lovin’ Paper Pack from Simple Stories. Trim the square down to 3 ¾” x 3 ¾”. Next, you’ll need to choose one of the plain tags and one of the word tags off the Tags patterned paper out of the Summer Lovin’ Paper Pack from Simple Stories. Distress the edges of all the elements. Out of the Page Pieces – Summer Lovin’ from Simple Stories, you’ll need the sun. Out of the Summer Lovin’ Journal Bits from Simple Stories, you’ll need the Sunny Days tab.
  Use E-Z Runner Adhesive from Scrapbook Adhesives by 3L to adhere the 3 ¾” paper element ¼” from the bottom and ¾” from the right of the dotted fishtail. Use 3D Foam Squares from Scrapbook Adhesives by 3L to adhere the plain side tag 7/8” from the left and ¾” from the bottom of the fishtail. Adhere the sun 1/2” from the left and ¼” from the bottom of the fishtail. Adhere the Sunny Days tab ¼” from the top of the word tag. Off the Summer Lovin’ Decorative Brads from Simple Stories, you’ll need three of the small brads and two medium brads. Adhere the two medium brads to the bottom left side of the word tag. Adhere the three small brads to the top right side of the plain tag.
  Next, you’ll need the Summer Vibes patterned paper out of the Summer Lovin’ Paper Pack from Simple Stories. Die cut a 4 1/2” Stitched Fishtail from Elizabeth Craft Designs out of the patterned paper. Take out the tight green plaid out of the 12×12 Basics Kit – Summer Lovin’ from Simple Stories. Die cut a 3 ½” Stitched Fishtail from Elizabeth Craft Designs out the patterned paper. Next, you’ll need the Journal Elements patterned paper out of the Summer Lovin’ Paper Pack from Simple Stories. Cut out the Summertime Love element. Choose a plain tag off the Tags patterned paper out of the Summer Lovin’ Paper Pack from Simple Stories. Out of the Summer Lovin’ Journal Bits from Simple Stories, you’ll need the pink heart banner. Out of the Page Pieces – Summer Lovin’ from Simple Stories, you’ll need These are the Days strip. Distress the edges of all the pieces. Out of the Summer Lovin’ Bits & Pieces from Simple Stories, you’ll need the yellow arrow and two fireflies. Distress the edges of all the pieces except for the fireflies.
  Use 3D Foam Squares from Scrapbook Adhesives by 3L to adhere the plain tag 1 3/8” from the left and 7/8” from the bottom of the fruit side of the 4 ½” fishtail. Use E-Z Runner Adhesive from Scrapbook Adhesives by 3L to adhere the Summertime Fun element to the green plaid fishtail as desired. Use 3D Foam Squares to adhere the green plaid fishtail ½” from the left and ½” from the bottom of the 4 ½” fishtail. Use adhesive and 3D Foam Squares to adhere the yellow label to the top right side of the green plaid fishtail. Adhere the pink heart banner 7/8” from the left and ½” from the bottom of the 4 ½” fishtail. Adhere the These Are the Days word strip 1 ½” from the left and ¼” from the bottom of the 4 ½” fishtail. To finish the page, adhere one firefly to the right of the yellow arrow and adhere the other firefly to the top left side of the pink heart banner.
  Flip the page three over. We will now be working on the pink dotted side of the fishtail. Choose one of the squares off the 2×2/4×4 Elements patterned paper out of the Summer Lovin’ Paper Pack from Simple Stories. Trim the square down to 3 ½” x 3 ½”, we will be using the back side of the piece. Next, you’ll need to choose one of the plain tags off the Tags patterned paper out of the Summer Lovin’ Paper Pack from Simple Stories. Distress the edges of all the elements. Out of the Page Pieces – Summer Lovin’ from Simple Stories, you’ll need the Lawn chair with pool and the Hello Summer Banner.
  Use E-Z Runner Adhesive from Scrapbook Adhesives by 3L to adhere the 3 ½” paper piece ¾” from the right and ½” from of the dotted fishtail. Use 3D Foam Squares from Scrapbook Adhesives by 3L to adhere the plain side tag 1 ½” from the right and ¼” from the bottom of the fishtail. Use adhesive and foam squares to adhere the lawn chair with pool ¾” from the right and ¾” from the bottom of the dotted fishtail. Use foam squares to adhere the hello summer banner to the bottom portion of the pool. Off the Summer Lovin’ Enamel Dots from Simple Stories, you’ll need five of the small dots. Adhere three enamel dots to the top left side of the 3 ½” paper piece. Adhere the remaining two enamel dots to the bottom right side of the 3 ½” paper piece.
  Next, you’ll need the Chill Out! patterned paper out of the Summer Lovin’ Paper Pack from Simple Stories. Die cut a 4 1/2” Stitched Fishtail from Elizabeth Craft Designs out of the patterned paper. Take out the tight pink plaid out of the 12×12 Basics Kit – Summer Lovin’ from Simple Stories. Die cut a 3 ½” Stitched Fishtail from Elizabeth Craft Designs out the patterned paper. Choose a plain tag off the Tags patterned paper out of the Summer Lovin’ Paper Pack from Simple Stories. Out of the Summer Lovin’ Journal Bits from Simple Stories, you’ll need the Just Another Day card and dotted label. Distress the edges of all the pieces. Out of the Summer Lovin’ Bits & Pieces from Simple Stories, you’ll need a ball, popsicle, and flip flops.
  Use E-Z Runner Adhesive from Scrapbook Adhesives by 3L to adhere the plain tag to the pink plaid fishtail, making sure 1” of the top of the tag is visible on the right-hand side. Adhere the Just Another Day note card ¾” from the left of the pink plaid fishtail as desired. Use 3D Foam Squares from Scrapbook Adhesives by 3L to adhere the pink plaid fishtail ¾” from the top and ¼” from the left of the snow cone fishtail. Out of the Summer Lovin’ Sticker Book from Simple Stories, you’ll need the dotted scallop border, cut the border down to fit the bottom of the pink fishtail. Out of the same sticker book, you’ll need to choose one of the label stickers and stick above the pink plaid fishtail on the top right side. Use adhesive to adhere the dotted label ¾” from the left of the pink plaid fishtail and 3/8” from the bottom of the snow cone fishtail. Use adhesive and foam squares to adhere the popsicles, flip flops, and balls in the bottom right corner of the pink plaid fishtail. From the sticker book, choose one of the word strips that has a coloured background and adhere the middle of the dotted label.
  Flip page five over. We will now be working on the multi dotted side of the fishtail. Choose one of the squares from the 2×2/4×4 Elements patterned paper out of the Summer Lovin’ Paper Pack from Simple Stories. Trim the square down to 3 ¾” x 3 ¾”. Next, you’ll need to choose one of the plain tags and one word tag off the Tags patterned paper out of the Summer Lovin’ Paper Pack from Simple Stories. Distress the edges of all the elements. Out of the Page Pieces – Summer Lovin’ from Simple Stories, you’ll need the tree. Out of the Summer Lovin’ Bits & Pieces from Simple Stories, you’ll need the Pool Party tab and pink banner with cone. Distress the edges of the pink banner.
  Use E-Z Runner Adhesive from Scrapbook Adhesives by 3L to adhere the 3 ¾” paper element ¼” from the bottom and ¾” from the right of the dotted fishtail. Use 3D Foam Squares from Scrapbook Adhesives by 3L to adhere the plain side tag 1 1/8” from the right and 7/8” from the bottom of the fishtail. Use adhesive and foam squares to adhere the tree ¼” from the bottom and part of the tree will hang over the right side of the fishtail. Adhere the pink banner ½” from the right and 3/8” from the bottom of the fishtail. Adhere the Pool Day tab 7/8” from the bottom right of the word tag. Off the Summer Lovin’ Decorative Brads from Simple Stories, you’ll need two of the small brads and one medium brad. Adhere the medium brad to the right side of the tree. Adhere the two small brads to the top left side of the 3 ¾” patterned paper piece.
 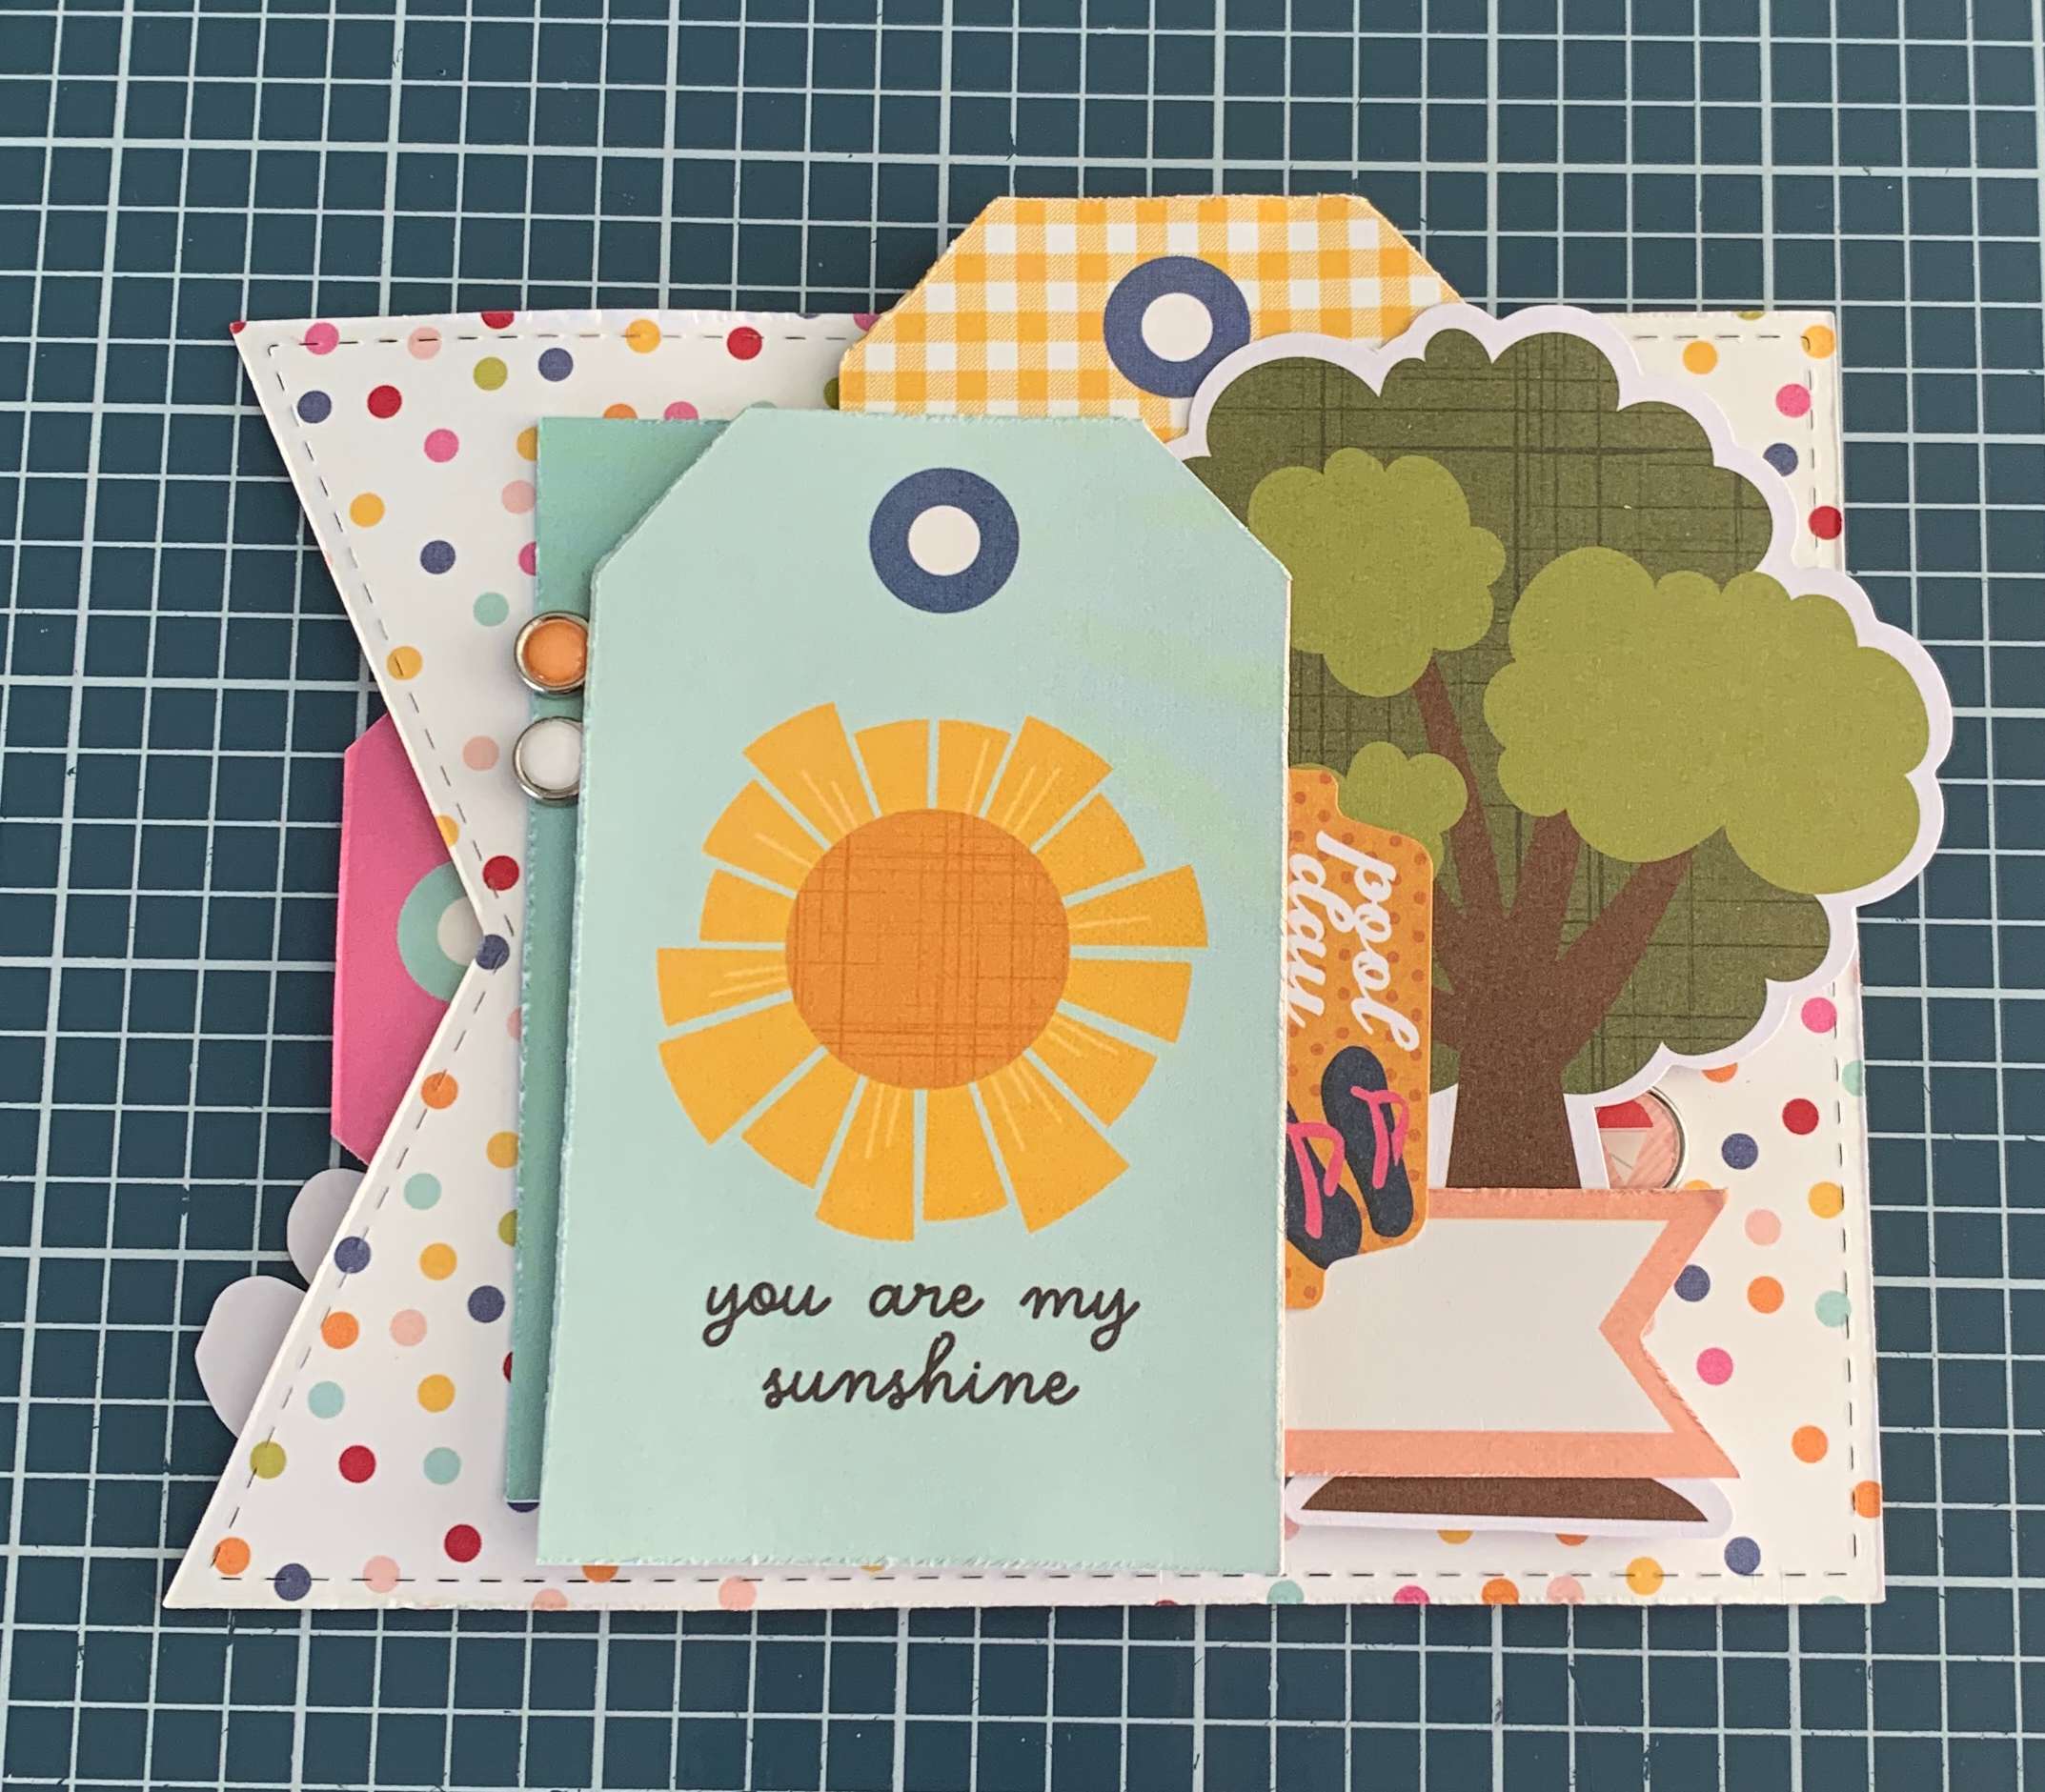 Next, you’ll need the Hey Sunshine! patterned paper out of the Summer Lovin’ Paper Pack from Simple Stories. Die cut a 4 1/2” Stitched Fishtail from Elizabeth Craft Designs out of the patterned paper. You’ll need the tight yellow plaid out of the 12×12 Basics Kit – Summer Lovin’ from Simple Stories. Die cut a 3 ½” Stitched Fishtail from Elizabeth Craft Designs out the patterned paper. Choose a plain tag off the Tags patterned paper out of the Summer Lovin’ Paper Pack from Simple Stories. Out of the Summer Lovin’ Journal Bits from Simple Stories, you’ll need the noted piece, yellow heart banner and pink label. Out of the Page Pieces – Summer Lovin’ from Simple Stories, you’ll need three hearts. Out of the Summer Lovin’ Bits & Pieces from Simple Stories, you’ll need the green arrow. Distress the edges of all the fishtails, noted piece, pink label and tag.
  Use 3D Foam Squares from Scrapbook Adhesives by 3L to adhere the plain tag 1 3/8” from the left and 7/8” from the bottom of the red side of the 4 ½” fishtail. Use E-Z Runner Adhesive from Scrapbook Adhesives by 3L to adhere the Noted piece to the left side of the yellow plaid fishtail as desired. Use adhesive to adhere the green arrow to the top right side of the yellow plaid fishtail. Adhere the pink label ½” from the left and 3/8” needs to show at the bottom of the yellow plaid fishtail. Use 3D Foam Squares to adhere the yellow plaid fishtail 3/8” from the left and 1/8” from the bottom of the 4 ½” fishtail. Use adhesive to adhere the yellow heart banner to the bottom portion of the yellow plaid fishtail as desired. Adhere one heart to the left of the yellow heart on the banner. Adhere the remaining two hearts to the bottom portion of the green arrow. Out of the Summer Lovin’ Sticker Book from Simple Stories, you’ll need to choose a word strip out of the book and adhere to the yellow heart banner as desired.
  The backside of the final page remains blank. You can decorative it if desired.
  To finish the mini album, punch a hole in the top left corner of each page. Use a jump ring to keep the mini album together.
  Here are a few closeups of the front cover of the mini album.
  Here are photos of the pages of my mini album.
  Thank you for joining me today and taking the time to check out my blog post. I hope that my These Are the Days Mini Album has inspired you to recreate your own at home.
You can find more of my work on my blog at: http://www.katelyngrosart.blogspot.ca

SUPPLIES
Simple Stories: Summer Lovin’ Collection – Page Pieces, 12×12 Paper Pack, Sticker Book, Floral Bits, Enamel Dots, Decorative Brads and 12×12 Basics Kits – Summer Lovin’
Elizabeth Craft Designs: Stitched Fishtails
Scrapbook Adhesives by 3L: 3D Foam Squares and E-Z Runner Permanent Tape
Join our Village of Inspired People
*Monthly Zoom Crops
*Live Demos
*Printable Step by Step Photo PDF’s
*AND SO MUCH MORE!
CLICK HERE and join today!

