fbpx
Creative Scrapbooker Magazine's Village of Inspired People promotional image featuring a collage of industry experts and instructors. The black background is decorated with daisies, and text highlights 'Join Now & Boost Your Creativity,' '43+ Classes Available Now,' 'Intimate, Interactive Online Classes,' and '100+ Live Demos & Printable Step-by-Step PDFs.' The main image features smiling individuals ready to teach creative classes.


Christmas Advent Calendar – Guest Post with Katelyn Grosart

Hey Creative Scrapbooker Fans! Christmas is right around the corner and I thought that it would be fun to share with you this fabulous Advent Calendar kit from Southern Ridge Trading Company. Using the advent calendar kit as well as adding some other chipboard pieces from Southern Ridge Trading Company and pairing them up with embossing powder from Emerald Creek Craft Supplies as well as a variety of products from Ranger Ink, I was able to create this beautiful vintage Advent Calendar. You’ll want to grab a cup of your favourite beverage as I have a tutorial for you, so that you can recreate this project in the comforts of your own home.

Katelyn Grosart, Creative Scrapbooker Magazine, csmscrapbooker, Southern Ridge Trading Co, Emerald Creek Crafts, Ranger, Tim Holtz,, Ideaology, Christmas, Advent calendars, Christmas advent calendars, altering chipboard, believe

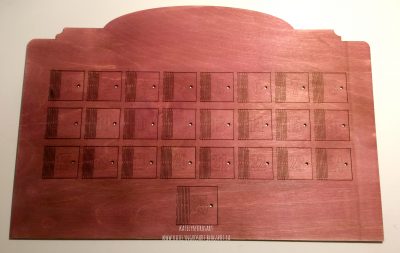
To start, you’ll need the top piece of the advent calendar, which is the piece that has the doors on it. Cover the entire surface with Victorian Velvet Distress Stain from Ranger Ink. Let dry for 20 minutes. Once it’s dry, lightly apply Walnut Stain Distress Ink from Ranger Ink overtop of the entire surface.

Katelyn Grosart, Creative Scrapbooker Magazine, csmscrapbooker, Southern Ridge Trading Co, Emerald Creek Crafts, Ranger, Tim Holtz,, Ideaology, Christmas, Advent calendars, Christmas advent calendars, altering chipboard, believe

Now that the top piece of the advent calendar is dry, flip it over so that you can stain the backs of the doors using Victorian Velvet Distress Stain from Ranger Ink. Set the piece aside to dry.

Katelyn Grosart, Creative Scrapbooker Magazine, csmscrapbooker, Southern Ridge Trading Co, Emerald Creek Crafts, Ranger, Tim Holtz,, Ideaology, Christmas, Advent calendars, Christmas advent calendars, altering chipboard, believe

With the top piece completely stained, you’ll need the middle portion of the advent calendar, the piece with the cut out squares. Cover the entire surface with Victorian Velvet Distress Stain from Ranger Ink. Set the piece aside to dry.

Katelyn Grosart, Creative Scrapbooker Magazine, csmscrapbooker, Southern Ridge Trading Co, Emerald Creek Crafts, Ranger, Tim Holtz,, Ideaology, Christmas, Advent calendars, Christmas advent calendars, altering chipboard, believe

Next, you’ll need the solid back piece. Cover the entire surface of one side with Victorian Velvet Distress Stain from Ranger Ink. Let dry for 20 minutes. With the stained side now dry, cover the entire surface of the other side using Victorian Velvet Distress Stain from Ranger Ink. Set aside the piece to dry.

Katelyn Grosart, Creative Scrapbooker Magazine, csmscrapbooker, Southern Ridge Trading Co, Emerald Creek Crafts, Ranger, Tim Holtz,, Ideaology, Christmas, Advent calendars, Christmas advent calendars, altering chipboard, believe

The last piece for the construction of the advent calendar that needs to be stained is the base. Cover the entire surface of one side of the base with Victorian Velvet Distress Stain from Ranger Ink. Let dry for 20 minutes. With the stained side now dry, cover the entire surface of the other side of the base using Victorian Velvet Distress Stain from Ranger Ink.

Katelyn Grosart, Creative Scrapbooker Magazine, csmscrapbooker, Southern Ridge Trading Co, Emerald Creek Crafts, Ranger, Tim Holtz,, Ideaology, Christmas, Advent calendars, Christmas advent calendars, altering chipboard, believe

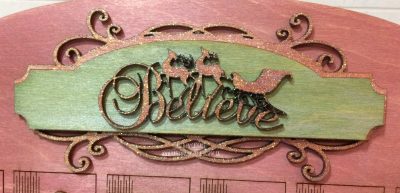
Before adhering the advent calendar together, the decorative elements still need to be stained for the advent calendar. Cover the four decorative corner pieces, the large scroll element at the top of the calendar and the word Believe with the reindeer in Victorian Velvet Distress Stain from Ranger Ink. Once the pieces have dried, apply Distress Embossing Ink from Ranger Ink to all the stained pieces. After the embossing ink has been applied, sprinkle Iridescent Embossing Powder from Emerald Creek Craft Supplies to all the pieces. Tap off the excess powder and emboss with a heat tool.

Katelyn Grosart, Creative Scrapbooker Magazine, csmscrapbooker, Southern Ridge Trading Co, Emerald Creek Crafts, Ranger, Tim Holtz,, Ideaology, Christmas, Advent calendars, Christmas advent calendars, altering chipboard, believe


Apply Bundled Sage Distress Stain from Ranger Ink to the numbers as well as the decorative banner piece that sits in between the large scroll element and the believe word at the top of the advent calendar. Before the numbers and decorative banner pieces are dry, lightly go over top of them with Brushed Pewter Distress Stain from Ranger Ink. Set the numbers and decorative banner aside to dry.

Katelyn Grosart, Creative Scrapbooker Magazine, csmscrapbooker, Southern Ridge Trading Co, Emerald Creek Crafts, Ranger, Tim Holtz,, Ideaology, Christmas, Advent calendars, Christmas advent calendars, altering chipboard, believe

Katelyn Grosart, Creative Scrapbooker Magazine, csmscrapbooker, Southern Ridge Trading Co, Emerald Creek Crafts, Ranger, Tim Holtz,, Ideaology, Christmas, Advent calendars, Christmas advent calendars, altering chipboard, believe

The last pieces you’ll need to stain are 10 Mini Wood Snowflakes from Southern Ridge Trading Company. Using Brushed Pewter Distress Stain from Ranger Ink cover all 10 mini wood snowflakes. Set the snowflakes aside to dry.

Katelyn Grosart, Creative Scrapbooker Magazine, csmscrapbooker, Southern Ridge Trading Co, Emerald Creek Crafts, Ranger, Tim Holtz,, Ideaology, Christmas, Advent calendars, Christmas advent calendars, altering chipboard, believe

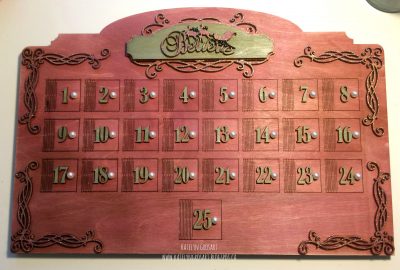
With all the elements that will decorate the advent calendar are now stained and embossed, it’s time to adhere the advent calendar pieces together. To start, adhere the advent calendar piece with the doors to the piece that has the squares cut out of it using Tombow Glue. Make sure that the side with the numbers and doors are facing out. Once the two pieces have been adhered together, cover the back of the cut out squares piece with Tombow Glue and adhere the back piece to the cut out squares piece. Apply pressure to the three layers until the glue has dried.

Katelyn Grosart, Creative Scrapbooker Magazine, csmscrapbooker, Southern Ridge Trading Co, Emerald Creek Crafts, Ranger, Tim Holtz,, Ideaology, Christmas, Advent calendars, Christmas advent calendars, altering chipboard, believe

Now it’s time to plug in your hot glue gun. Using your hot glue gun, apply glue to the decorative corners, and adhere one decorative corner in each of the four corners on the top of the advent calendar where the doors are. With the decorative scrolls adhered, use the hot glue gun to adhere the large scroll element to the middle of the top of the advent calendar. Next, adhere the decorative banner piece to the middle of the large scroll element using the hot glue gun. To finish that decorative element, use the hot glue gun and adhere the believe word to the middle of the decorative banner element. Once the top element is adhered, adhere a pearl to each of the doors using the hot glue gun.

Katelyn Grosart, Creative Scrapbooker Magazine, csmscrapbooker, Southern Ridge Trading Co, Emerald Creek Crafts, Ranger, Tim Holtz,, Ideaology, Christmas, Advent calendars, Christmas advent calendars, altering chipboard, believe


To finish the advent calendar doors, adhere the numbers using a hot glue gun.

Katelyn Grosart, Creative Scrapbooker Magazine, csmscrapbooker, Southern Ridge Trading Co, Emerald Creek Crafts, Ranger, Tim Holtz,, Ideaology, Christmas, Advent calendars, Christmas advent calendars, altering chipboard, believe

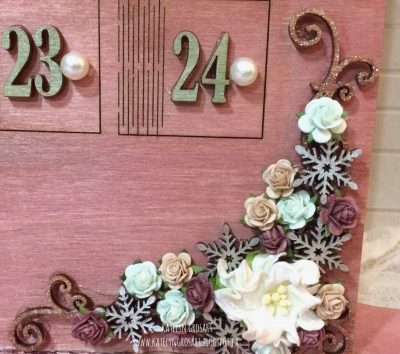
To add some interest in the top left and bottom right hand corners, add 5 of the mini wood snowflakes, a white flower, 5 light green roses, 4 tan roses and 6 dark pink roses in each of the corners. Play around with the flowers and snowflakes as desired. Once your happy with the layout of your flowers and snowflakes, adhere them using your hot glue gun.

Katelyn Grosart, Creative Scrapbooker Magazine, csmscrapbooker, Southern Ridge Trading Co, Emerald Creek Crafts, Ranger, Tim Holtz,, Ideaology, Christmas, Advent calendars, Christmas advent calendars, altering chipboard, believe

Katelyn Grosart, Creative Scrapbooker Magazine, csmscrapbooker, Southern Ridge Trading Co, Emerald Creek Crafts, Ranger, Tim Holtz,, Ideaology, Christmas, Advent calendars, Christmas advent calendars, altering chipboard, believe


Once the front of your advent calendar has been decorated, adhere the advent calendar to the base using a hot glue gun.

Katelyn Grosart, Creative Scrapbooker Magazine, csmscrapbooker, Southern Ridge Trading Co, Emerald Creek Crafts, Ranger, Tim Holtz,, Ideaology, Christmas, Advent calendars, Christmas advent calendars, altering chipboard, believe


Here are a few close up pictures of all the elements once the advent calendar has been adhered to the base.

Katelyn Grosart, Creative Scrapbooker Magazine, csmscrapbooker, Southern Ridge Trading Co, Emerald Creek Crafts, Ranger, Tim Holtz,, Ideaology, Christmas, Advent calendars, Christmas advent calendars, altering chipboard, believe

Katelyn Grosart, Creative Scrapbooker Magazine, csmscrapbooker, Southern Ridge Trading Co, Emerald Creek Crafts, Ranger, Tim Holtz,, Ideaology, Christmas, Advent calendars, Christmas advent calendars, altering chipboard, believe

Katelyn Grosart, Creative Scrapbooker Magazine, csmscrapbooker, Southern Ridge Trading Co, Emerald Creek Crafts, Ranger, Tim Holtz,, Ideaology, Christmas, Advent calendars, Christmas advent calendars, altering chipboard, believe

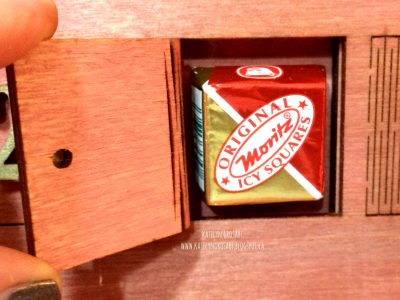
To finish your advent calendar, make sure to add a chocolate in behind each of the doors.

Katelyn Grosart, Creative Scrapbooker Magazine, csmscrapbooker, Southern Ridge Trading Co, Emerald Creek Crafts, Ranger, Tim Holtz,, Ideaology, Christmas, Advent calendars, Christmas advent calendars, altering chipboard, believe


Supplies Used:

  • Southern Ridge Trading Company: Advent Calendar Kit, Mini Wood Snowflakes, 10mm Roses in: light green, dark pink & tan, White Flowers
  • Emerald Creek Craft Supplies: Iridescent Shimmer Embossing Powder
  • Tim Holtz for Ranger Ink: Distress Embossing Ink, Walnut Stain Distress Ink, Victorian Velvet Distress Stain, Brushed Pewter Distress Stain, Bundled Sage Distress Stain
  • Tim Holtz Ideaology: Baubles
  • Tombow Glue
  • Misc: Hot Glue Gun & Heat Tool

Thanks so much for joining me today and I hope that you’re inspired to order and create your own Christmas Advent Calender!

You can find more of my work on my blog at: http://www.katelyngrosart.blogspot.ca

Happy Creating!

– Katelyn

To see more of these products in action, be sure to pick up our latest issue of Creative Scrapbooker Magazine. Use MAGFINDER to find a store near you!

@csmscrapbooker #creativescrapbookermagazine #creativescrapbooker #publication #fallissue #inastorenearyou


Author


Write A Comment

Comments

  1. Katelyn this is fantastic! Southern Ridge what an awesome calendar. CSM as always, Thank you from the bottom of my ❤️

  2. What an amazing project Katelyn!! Love that used the Victorian Velvet colour! Can’t wait to get my hands on one of those Advent Kits! CSM..awesome decision on the guest blogger 🙂

  3. Great project using Southern Ridge Chipboard kit and Emerald Creek powders! Love both of these company’s products! Katelyn, you have done an amazing job with this!

February 15th/25

WATCH THE REPLAY: CLICK HERE

Zoom Crop Information PDF: CLICK HERE

FREE Layout Template Guide: CLICK HERE

VIP Zoom Crop

Friday January 17th Zoom Meeting:
Link to replay: CLICK HERE

Saturday January 18th Zoom Meeting:
Link to replay: CLICK HERE

December 30/24 Online Class

CLICK HERE for the Link for Your Crafty Homework

This includes the eBook and printable materials for the class.
Please note: You’ll need to provide your email address, as Nadine Milton will send the information directly to you.

CLICK HERE for the Link for the Information PDF

This includes the supply list for this class.

VIP Zoom Crop
Friday November 8th: 7:00pm - 10:00pm MST
Saturday November 9th: 10:00am - 10:00pm MST

You will need the ZOOM App on your computer or phone.

Nov 8th - Friday Night
Topic: Zoom Crop #43 - ArtFest hosted by Dooreen Rousseau - FRIDAY NIGHT!
Time: Nov 8, 2024 07:00 PM Mountain Time (US and Canada)
Link: https://us06web.zoom.us/j/87256071707?pwd=F7077MJSL1JLNEK7CMXygrHC0hVAlw.1
Meeting ID: 872 5607 1707
Password: 309205

Nov 9th – Saturday
Topic: Zoom Crop #43 - ArtFest Hosted by Dooreen Rousseau - SATURDAY
Time: Nov 9, 2024 10:00 AM Mountain Time (US and Canada)
Link: https://us06web.zoom.us/j/87925186090?pwd=EEPjhi54pyB6YQ3olyaJaYggcGRGxP.1
Meeting ID: 879 2518 6090
Password: 222409

Zoom Crop Information PDF: CLICK HERE

July 12, 2024 - Zoom Crop

WATCH THE REPLAY: CLICK HERE

Here are the times of the demos
1:12:07 - Demo - Page Builders Club House with Tracy Pounds
Here is the PDF link for Tracy's demo with the instructions and products she used: CLICK HERE

3:03:27 - Demo – Infinity Crafts with April Floriant

Thanks so much to everyone who joined and hope to see you all again on Friday, August 9th – from 10:00am to 2:00pm MDT.

July 24/24 Online Class

View the Class Video: Click Here

View the Info PDF: Click Here

Link to purchase the Craft Along Kit: Click Here

April 30/24 Online Class


View the Info PDF: Click Here

Link to purchase the Craft Along Kit: Click Here

December 9/23 Zoom Crop

8 Hour Zoom Crop: Click Here

After Hours Zoom Crop: Click Here

September 27th/23 Online Class


View the Info PDF: Click Here

Link to purchase the Craft Along Kit: Click Here

This website uses cookies to ensure you get the best experience on our website. Learn more

VIP Zoom Crop
Saturday April 5th: 10:00am - 6:00pm MST

You will need the ZOOM App on your computer or phone.

Join Zoom Meeting Link will be available right here on our designated CROP DAY. See you all then!

Zoom Crop Information PDF: CLICK HERE