Tag

card making

Browsing

Hello everyone Annette Allen here today on the Creative Scrapbooker Magazine blog with a cute little OH HAPPY DAY card featuring a variety of supplies by Pink & Main! Here is how I put it together : Make card from white cardstock (4.5×5.5) Lay your Pink & Main stencil directly on the card base and spray with Ranger Distress Oxide Spray. Set aside and let dry or use a heat gun to dry faster. Stamp images on white cardstock and color. Die cut colored images with coordinating dies. Stamp the sentiment on white cardstock. Trim around the sentiment. Die cut the Frame on white cardstock and spray with Ranger Distress Oxide Spray. Set aside and let dry or use a heat gun to dry faster. Adhere the dried frame on the card base. Using Scrapbook Adhesives by 3L 3D Foam Squares adhere the images in the center of the card.…

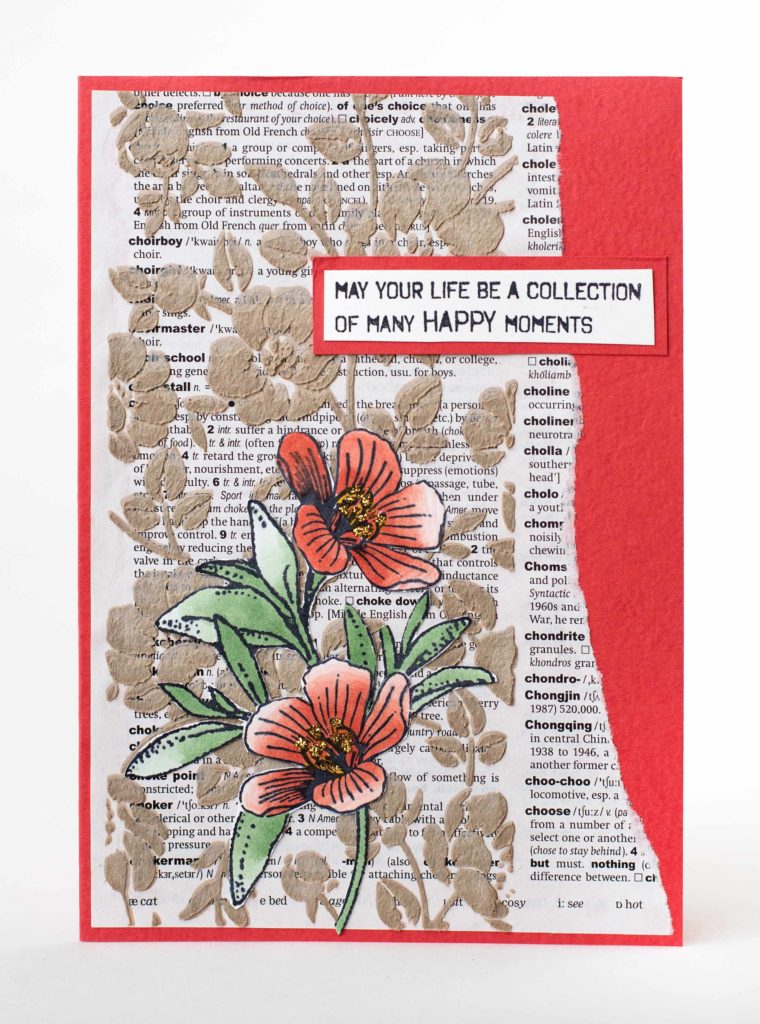
The winter issue of Creative Scrapbooker Magazine has a FABULOUS article written by our Frugal Scrapbooker – Connie Nichol – all about Repurposing Dictionaries.ย  There are cards, art journaling pages, and layouts all featuring a number of different ways to use dictionary pages on your projects.ย  I love it! Here is an example of one of the cards you will find designed by Connie Nichol. Connie’s card features Stampers Anonymous Tim Holtz Stencils Stampers Anonymous Wendy Vecchi Stamps Ranger Grit-Paste Glue Dots Adhesives Be sure to grab your copy of the winter issue today! CLICK HERE Happy Scrapbooking SUBSCRIBE TODAY! to Creative Scrapbooker Magazine

ย  Hi Creative Scrapbooker Fans!!!! Pam Bray here sharing “Dream Big Dreams” Mixed Media Card featuring Wild Whisper A Girl With Flair Watercolor patterned paper and Emerald Creek Craft Supplies Rock Candy Embossing Powder. Creating the background paper for this mixed media card is super easy using a Gelli Art Press Printing Press, DecoArt Paint, and brayer.ย  1. Begin by applying Titanium paint to the top of the Gel Printing Press;ย  move around with brayer. Add a bit of paint here and there to achieve the colors on the press you like. 2. Press white cardstock to the top; pull off and set to one side. Repeat with a clean piece of cardstock. 3. Stamp background collage stamp to top of the prepared paper using Titanium White and Cadmium Red to the top. 4. Stamp here and there. Adhere prepared paper to Wild Whisper Watercolor Paper to green cardstock. Adhere…

Hello everyone, Cathie Allan here today on the Creative Scrapbooker Magazine blog. I am so excited to share with you my blog post for February. It involves a gorgeous Hydrangea stamp along with a few other stamps and dies from the amazing Heartfelt Creations. This amazing company constantly creates stamps and dies to inspire.ย  Of course, I broke out my pigment inks and I now have a totally awesome collection of Tsukinekoโ€™s, StazOn, Pigment ink. If you are like me โ€ฆ and love to incorporate window plastic or transparencies to your projects, this ink will blow your โ€˜”stamping on window plasticโ€ mind :). I will also share with you a delightful little cleaner that will clean this โ€œrelatively, new inkโ€ off of your rubber stamps and your clear stamps and โ€œnourish your stampsโ€ at the same time. Letโ€™s check it out! Using the โ€œStazOn inkโ€ of your dreams, stamp the…

Hey Creative Scrapbooker Fans! It has been snowy and wet here on the West Coast of Canada and I have already started counting down the days until Spring arrives. So for todayโ€™s project, Iโ€™ve created this fun and bright The Journey is the Start Card. To create my card, Iโ€™ve used stamps, inks and Paints from Ranger Ink , ย Super Stock from Creative Scrapbooker Magazine, dies from Elizabeth Craft Designs, embossing powder from Emerald Creek Craft Supplies and adhesive from Scrapbook Adhesives by 3L. Youโ€™ll want to grab a cup of your favourite beverage and learn how to recreate my card at home. To start, die cut a 4โ€ Stitched Rectangle from Elizabeth Craft Designs out of Super Stock from Creative Scrapbooker Magazine. Next, youโ€™ll need the Honeycomb Small Dylusions Stencil from Ranger Ink. Place the stencil on the rectangle piece as desired and use a blending tool with foam…

Hello everyone! Itโ€™s Kerry Engel, here today to share with you an adorable card that is just begging to be touched. Between the embossing, stenciling and flocking this card is full of texture-therapy; for the maker and the receiver. Cards for any occasion are my favorite ones to keep in my stash. This cute little die-cut owl could be used on a multitude of occasions and I find his tummy is just the right size to hold a sentiment. My favourite trick when putting together more detailed die cut items is to use 3D Foam Squaresย under key areas. I used the Scrapbook Adhesives by 3L 3D Foam Squares to raise my owlโ€™s head up and away from his body. Therm O Web Deco Foil Flock Transfer Sheets cut like butter and emboss like a boss. To create this adorable Owl I used the Therm O Web Deco Foil Flock Transfer…

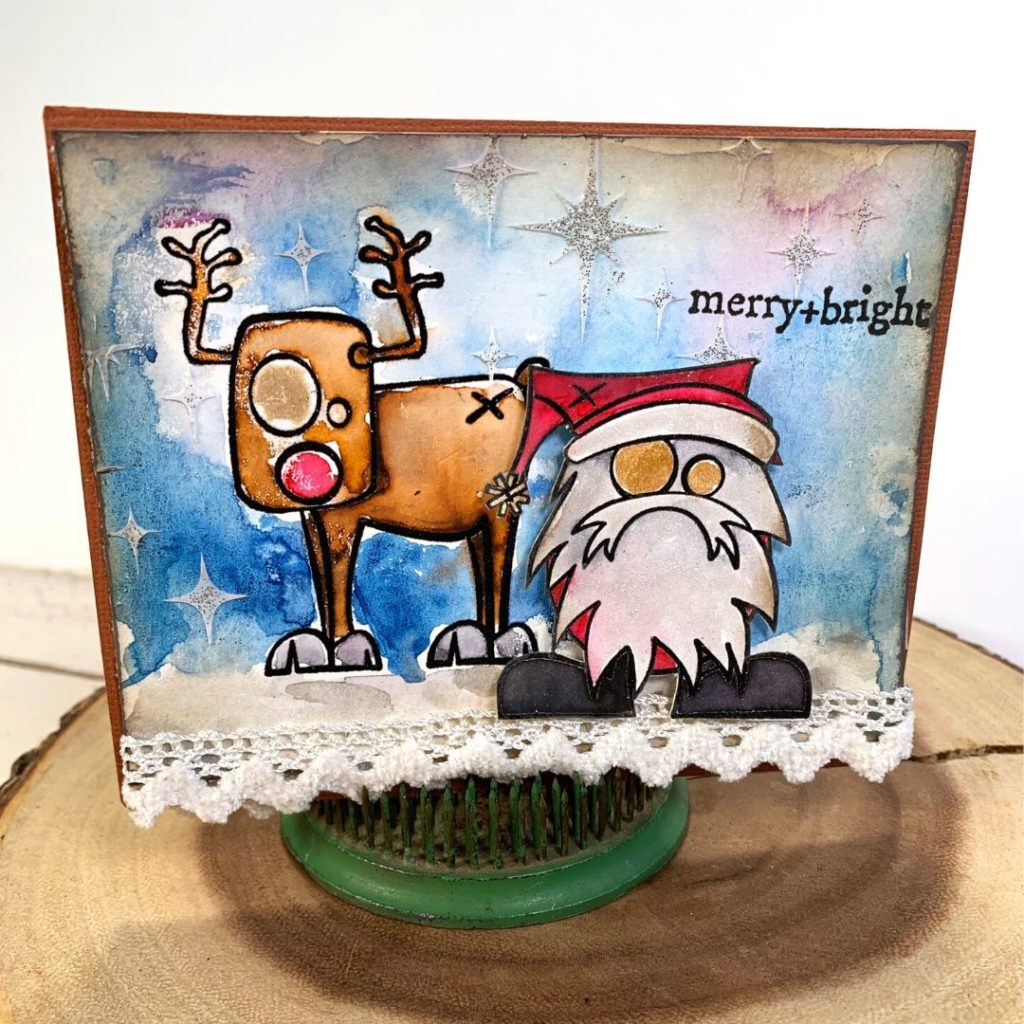
Kerry Engel has been a busy little elf creating Christmas cards for this holiday season. Recently, she created a super fun card featuring the Stampers Anonymous Tim Holtz Merry Misfits stamp collection. Here is the card she designed. Kerry created the background using Kuretake Gansai watercolours. Stampers Anonymous Tim Holtz Sparkle Stencil. Ranger Texture Paste. Ranger Stickles. Kerry glued everything down using Glue Dots Adhesives. LOVE LOVE LOVE this card Kerry! You can send it to me ๐Ÿ™‚ The Merry Misfits stamp set is calling my name! You can send it to me ๐Ÿ™‚ Kerry is a MORNING crafter! Every morning before she heads off to work she takes some time in her craft room. Once or twice a week she shares what she has been working on,ย  within the Creative Scrapbooker Magazine Instagram Stories. Be sure to follow us on Instagram so you won’t miss what is cooking at…

Gnomes are HOT this holiday season! And they should be – they are smile makers! Kerry Engel was busy in her craft room playing with some Gnome themed stamps by Impression Obsession. The results are super fun! Here are the stamps that Kerry used. She fussy cut and popped up elements using Scrapbook Adhesives by 3L 3D Foam Squares. Here is another one of her creations. This is the sentiment Kerry stamped inside. SOOO fun!!!! I have to go grab these stamps! Thank you, Kerry, for the inspiration! Kerry is a MORNING crafter! Every morning before she heads off to work she takes some time in her craft room. Once or twice a week she shares what she has been working on,ย  within the Creative Scrapbooker Magazine Instagram Stories. Be sure to follow us on Instagram so you won’t miss what is cooking at Kerry’s house! CLICK HERE Have a…

Design team member Kim Gowdy had some serious fun playing with the Let’s Shake Our Tail Feathers stamp set by Picket Fence Studios! Check out this GORGEOUS card she designed. Here is the Let’s Shake Our Tail Feathers stamp set by Picket Fence Studios that she used. She paired that set with the Picket Fence Studios The Hen House stamp set and coordinating die. That chicken makes a perfect peacock! Kim used Ranger Tim Holtz Distress Oxide inks to color the card. The ink was applied using Picket Fence Studios The Life Changing Blender Brushes. Everything on Kim’s card was adhered using Scrapbook Adhesives by 3L including 3D Foam Square to pop up the peacock! Here is another look. It’s Friday night!ย  A perfect time to “shake those feathers”.

Kerry Engel has been a little Christmas Elf creating Christmas cards for friends and families. Recently she was playing with the Impression Obsession Birch Logs & Twigs die set. Look at this beautiful card that she designed. Here are a few details of all those glorious layers. She adhered everything down using Glue Dots Glue Lines. Perfect for those birch logs. The Merry Christmas sentiment is also an Impression Obsession die. GORGEOUS GORGEOUS GORGEOUS! It’s a little piece of a winter wonderland! I am thinking that both the Merry Christmas AND the Birch Logs & Twigs die sets by Impression Obsession are a MUST HAVE! Thanks, Kerry! Kerry is a MORNING crafter! Every morning before she heads off to work she takes some time in her craft room. Once or twice a week she shares what she has been working on,ย  within the Creative Scrapbooker Magazine Instagram Stories. Be sure…

January 28/26 Online Class

View the Info PDF: Click Here

Link to purchase the Craft Along Kit: Click Here

Recap Video Click Here

February 15th/25

WATCH THE REPLAY: CLICK HERE

Zoom Crop Information PDF: CLICK HERE

FREE Layout Template Guide: CLICK HERE

VIP Zoom Crop

Friday January 17th Zoom Meeting:
Link to replay: CLICK HERE

Saturday January 18th Zoom Meeting:
Link to replay: CLICK HERE

December 30/24 Online Class

CLICK HERE for the Link for Your Crafty Homework

This includes the eBook and printable materials for the class.
Please note: Youโ€™ll need to provide your email address, as Nadine Milton will send the information directly to you.

CLICK HERE for the Link for the Information PDF

This includes the supply list for this class.

VIP Zoom Crop
Friday November 8th: 7:00pm - 10:00pm MST
Saturday November 9th: 10:00am - 10:00pm MST

You will need the ZOOM App on your computer or phone.

Nov 8th - Friday Night
Topic: Zoom Crop #43 - ArtFest hosted by Dooreen Rousseau - FRIDAY NIGHT!
Time: Nov 8, 2024 07:00 PM Mountain Time (US and Canada)
Link: https://us06web.zoom.us/j/87256071707?pwd=F7077MJSL1JLNEK7CMXygrHC0hVAlw.1
Meeting ID: 872 5607 1707
Password: 309205

Nov 9th โ€“ Saturday
Topic: Zoom Crop #43 - ArtFest Hosted by Dooreen Rousseau - SATURDAY
Time: Nov 9, 2024 10:00 AM Mountain Time (US and Canada)
Link: https://us06web.zoom.us/j/87925186090?pwd=EEPjhi54pyB6YQ3olyaJaYggcGRGxP.1
Meeting ID: 879 2518 6090
Password: 222409

Zoom Crop Information PDF: CLICK HERE

July 12, 2024 - Zoom Crop

WATCH THE REPLAY: CLICK HERE

Here are the times of the demos
1:12:07 - Demo - Page Builders Club House with Tracy Pounds
Here is the PDF link for Tracy's demo with the instructions and products she used: CLICK HERE

3:03:27 - Demo โ€“ Infinity Crafts with April Floriant

Thanks so much to everyone who joined and hope to see you all again on Friday, August 9th โ€“ from 10:00am to 2:00pm MDT.

July 24/24 Online Class

View the Class Video: Click Here

View the Info PDF: Click Here

Link to purchase the Craft Along Kit: Click Here

April 30/24 Online Class


View the Info PDF: Click Here

Link to purchase the Craft Along Kit: Click Here

December 9/23 Zoom Crop

8 Hour Zoom Crop: Click Here

After Hours Zoom Crop: Click Here

September 27th/23 Online Class


View the Info PDF: Click Here

Link to purchase the Craft Along Kit: Click Here

This website uses cookies to ensure you get the best experience on our website. Learn more

VIP Zoom Crop
Friday January 16th: 6:00pm - Midnight MST
Saturday January 17th: 10:00am - Midnight MST
Hosted by: Simply Stated Design

You will need the ZOOM App on your computer or phone.

Friday Zoom Meeting:
Link: https://us06web.zoom.us/j/81311221698?pwd=gXkeFjnWDekB0nRHohTqwYpTqZPyps.1
Meeting ID: 813 1122 1698
Password: 751404

Saturday Zoom Meeting:
Link: https://us06web.zoom.us/j/87948630680?pwd=ulxwatsEwIEakz6c5fvQ341BIouJ2t.1
Meeting ID: 879 4863 0680
Password: 862986

Zoom Crop Information PDF: CLICK HERE

To purchase the Craft Along Kit: CLICK HERE