Tag

Ranger Distress ink

Browsing

Hello Friends its Karan Gerber here with you today on the Creative Scrapbooker blog sharing a Christmas card with you using Heartfelt Creations paper, stamps and coordinating dies. What i love about the collections from Heartfelt Creations is how easy it is to create gorgeous cards by just adding a few die cut images. I am working with the papers from the Festive Holly Collection Stamps and dies also from the Festive Holly Collection and the small poinsettias are from Celebrate the Season Today I am using distress inks from Ranger and Zig Clean Color Brush Markers from Kuretake to color my images. Lets get started; stamp out your images on canson water color paper using Archival Coffee Ink. Begin to color with the zig makers. I used the following colors.Next die cut outtheΒ  above images, then stamp poinsettias from Celebrate the Season on canson watercolor paper using Archival Coffee…

Kim Gowdy is on our web show today walking you through how to create die cut inserts. This is a relatively simple technique that gives your project an added sense of depth and slightly more texture. This technique is even easier if you have coordinating dies for your stamps so you eliminate any tedious fussy cutting. No Talkie Before Coffee Here is the card that Kim will be stepping out on our webshow. The Art Impressions stamped image of the happy lady spinning in her office chair was stamped and then cut out with a coordinating die. Kim then used the coordinating die to cut out where she would like to place the image on her card. Next she simple adhered the die cut stamped image into the space – creating a die cut insert.Β  Pretty simple. If I confused you – it will all be clear after you watch…

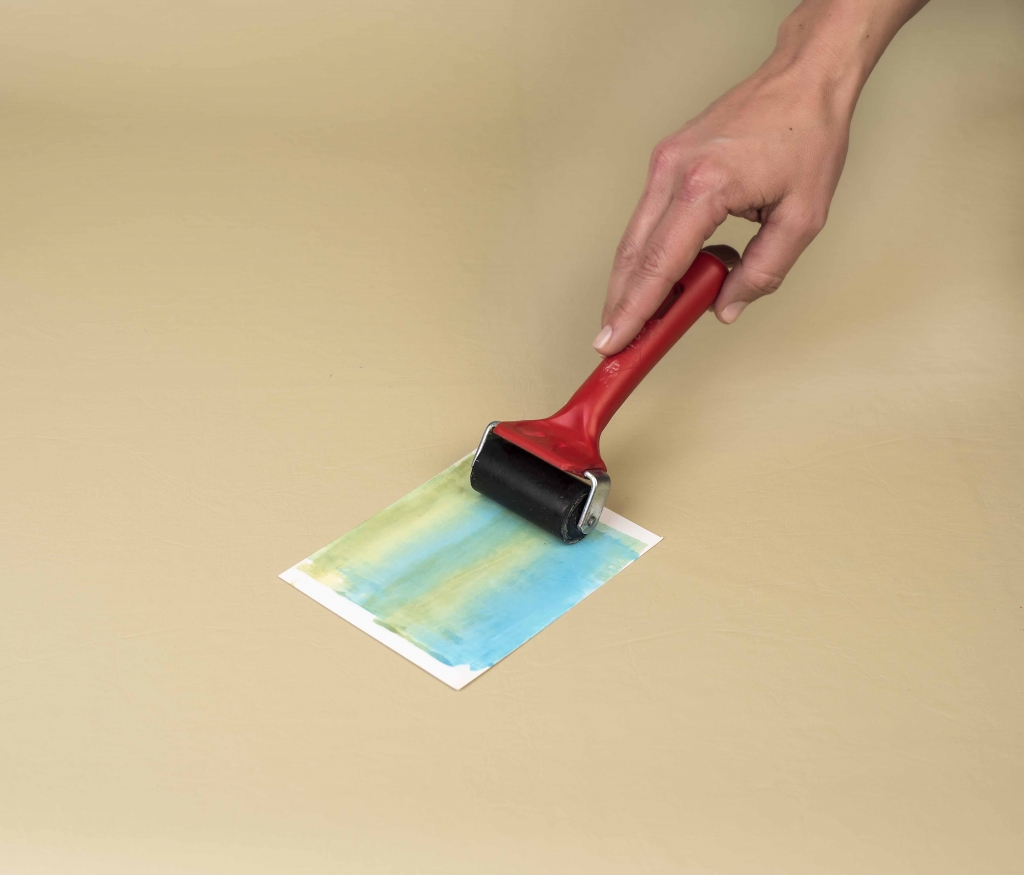
Today we are looking back to the Summer 2016 issue of Creative Scrapbooker Magazine where Christy Riopel featured the brayer in her regular Tool Junkie column. Using the brayer as her base tool, Β she created three very different projects including this gorgeous, yet extremely simple layout of her daughter Brittany. Β Christy created the soft ombre effect you can see on the stamped image aswell as on the photo mat behind the gorgeous photo of Brittany using a brayer, Ranger distress inks and a custom blend distress ink pad. The Project The Supplies Stampin’ Up! cardstock and glossy cardstock, Ranger distress ink and custom blend distress ink pad, Impression Obsession stamp, Scrapbook Adhesives by 3L, Sakura Pigma Micron pen. The Step By Steps – In Christy’s Words I used a blank Custom Blend Distress ink pad as my base. Choose three or so colours of Ranger Distress Ink re-inkers. It works…

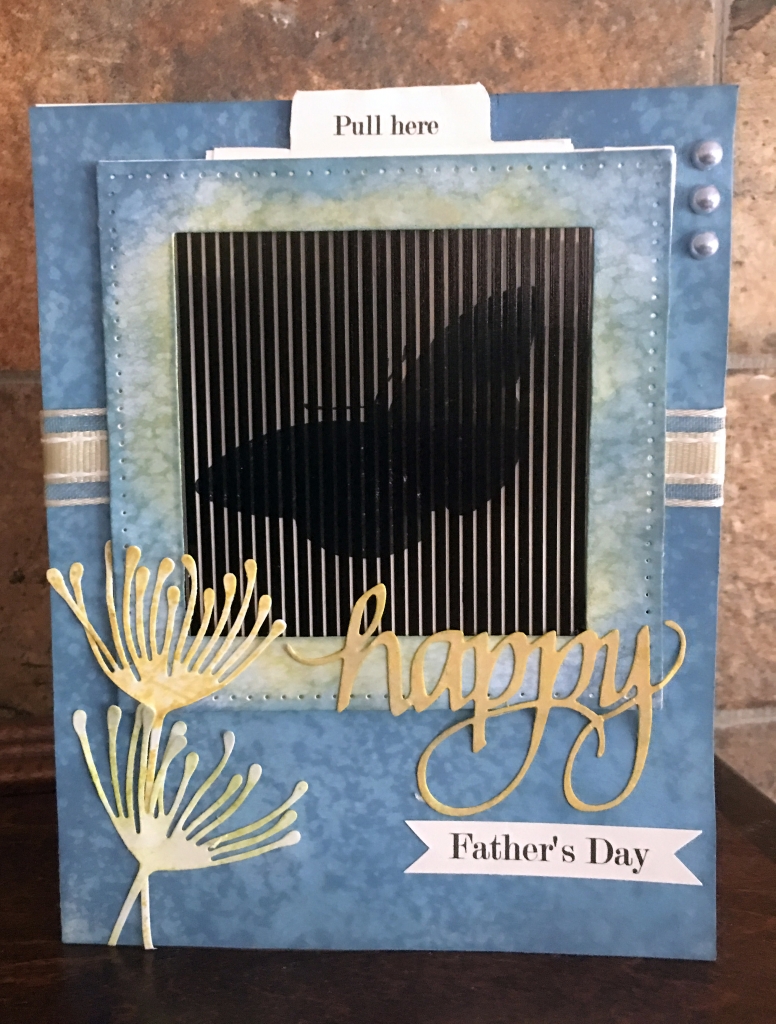
Hello, Connie Nichol here today with an interactive card featuring Uchi’s Design animation stamps, Elizabeth Craft Designs dies and Ranger Distress Oxide inks. Β How fun is it to have a flying butterfly card? I designed this card around these very cool animated stamps from Uchi’s Design. Β Basically you stamp the image, place the animation grid over top and when the grid moves, your stamped image comes to life. To make my card, I began by stamping the biggest butterfly onto a piece of white cardstock and adding a pull tab. I then used Elizabeth Craft Designs stitched square dies to create a square frame for my butterfly. Β You want the frame to be slightly larger than your stamped butterfly so that it will create a pocket. I sponged some distress oxide ink onto the frame and misted with water, then adhered the animation grid to the frame. I adhered three…

Wondering what all the fuss is about with the Creative Memories Original Border Maker System? Β Watch Kim Gowdy show you basic techniques with this fool proof tool for creating borders.Β Here is the layout Kim designed. Featuring the Creative Memories Original Border Maker System Impression Obsession stamps Ranger distress ink Chameleon Pens detailed pen Grab a coffee for this quick and simple tutorial https://www.youtube.com/watch?v=q__pkply49U&t=2s Happy Scrapbooking everyone! SUBSCRIBE TODAYΒ to our quarterly publication – delivered right to your door!

Hello! Kim here today, I love when I get to share what I’ve been up to on the blog. I’ve been having fun playing with Distress Oxide inks, I ordered an entire set after seeing them at Creativation 2017 in January. They are easy to layer, emboss and stamp with. The icing on the cake is the magic that happens when you add a spritz or two of water to the mix! Here is the fun Easter card I put together this past weekend. I used some of my favourite Ranger/Tim HoltzΒ products and an alpha die set from Elizabeth Craft Designs. My background was created by adding layers of Distress Oxide ink to water colour paper. I dried each layer with my heat gun before adding the next layer to keep the colours separate. I pounced a bit of the ink through a stencil for added interest as well as…

Hey Creative Scrapbooker Fans!Β  With Easter right around the corner, I thought I would share with you today an Easter card for that special someone in your life.Β Using the Butterfly Kisses Collection fromΒ Bo Bunny, a variety of dies fromΒ Elizabeth Craft Designs, stamps, stones and embossing powder from Emerald Creek Craft Supplies and a variety of products fromΒ Ranger Ink, I was able to create this beautiful Easter card. You’ll want to make sure to grab a cup of your favourite beverage, as I will show you how to recreate this project in the comforts of your own home. Using the Gatefold – Elegant Rose die from Elizabeth Craft Designs, die cut the gatefold out of Tutu Double Dot from Bo Bunny. With the gatefold cut out, trim two pieces out that measure 2” x 1 ¾”. Apply Emboss It Ink from Ranger Ink to both pieces. Once the ink is…

Hoppy Easter to you! Β Easter is just around the corner and I made a rustic little framed bunny card forΒ Xyron. Β How can you not love these mossy little bunnies! Β The XyronΒ Create a StickerΒ works wonders for attaching the moss. TheΒ Ornate Frame 2Β die is the perfect frame for this adorable bunny. Β Applying the RangerΒ Emboss ItΒ dauber makes for fast application. Β Sprinkle with Emerald Creek Craft SuppliesΒ Oil Rubbed BronzeΒ embossing powder then rub the edges clean for a rustic worn look. Exposing the edges allows to some inking with RangerΒ Brushed CorduroyΒ distress ink. Β TheΒ Create a StickerΒ is the perfect size for those smaller die cuts to apply adhesive effortlessly and without the sticky mess for applying the moss. I love having moss in my stash. Β Push the moss into place and trim off the moss around the bunny. Β The frame is bigger so I used theΒ Creative StationΒ with theΒ 5″ cartridge refillΒ running it through face up. Β Rub the frame…

Kim here with my take on the February sketch. This is not my best work, but I had fun with this layout. I feel like I have been in a creative funk since January and am slowly coming off the couch back into my craft room! I am NOT a lover of winter and the darkness that comes with it! Working with a sunset picture seemed a good choice! I just let myself play and put ZERO pressure on the results. I added a thin layer of Dina Wakley Media Gesso to my CSM Superstock and then β€œmessy” coloured my circles with Distress Crayons. Once my colour was on my page, I used a water brush to blend it and even it out. My spiral line and writing was done with a Dylusions Paint Pen – I LOVE THESE!!!!! I used a Magenta stencil with Black Soot Distress Ink for…

Hi, Tracy here! Today I wanted to share a quick and easy card idea using Stampin’ Up! Stamps, Ranger Archival Ink, Chameleon Pens and Scrapbook Adhesives by 3L. Project Recipe: Stampin’ Up! – Falling Flowers Stamp Set- Β Flourishing Phrases Stamp Set (Sentiment) – Cardstock- white and black Ranger- Tim Holtz Distress Archival Ink- Soot Black – Stickles- Yellow Chameleon Pens – YO3, YG3, RD4, BG4, PR4 Scrapbook Adhesives by 3L- EZ Runner Grand, Black 3D Foam Squares I started with a piece of white cardstock that was 3.75×5. Using my Ranger Archival ink I stamped the Stampin’ Up! flowers and leaves along the top and bottom of the cardstock. This stamp set is perfect for trying Chameleon markers for the first time. The lines of the images are a little thicker, providing a little more forgiveness when colouring. Once my images were coloured I added my sentiment. I picked nice…

January 28/26 Online Class

View the Info PDF: Click Here

Link to purchase the Craft Along Kit: Click Here

Recap Video Click Here

February 15th/25

WATCH THE REPLAY: CLICK HERE

Zoom Crop Information PDF: CLICK HERE

FREE Layout Template Guide: CLICK HERE

VIP Zoom Crop

Friday January 17th Zoom Meeting:
Link to replay: CLICK HERE

Saturday January 18th Zoom Meeting:
Link to replay: CLICK HERE

December 30/24 Online Class

CLICK HERE for the Link for Your Crafty Homework

This includes the eBook and printable materials for the class.
Please note: You’ll need to provide your email address, as Nadine Milton will send the information directly to you.

CLICK HERE for the Link for the Information PDF

This includes the supply list for this class.

VIP Zoom Crop
Friday November 8th: 7:00pm - 10:00pm MST
Saturday November 9th: 10:00am - 10:00pm MST

You will need the ZOOM App on your computer or phone.

Nov 8th - Friday Night
Topic: Zoom Crop #43 - ArtFest hosted by Dooreen Rousseau - FRIDAY NIGHT!
Time: Nov 8, 2024 07:00 PM Mountain Time (US and Canada)
Link: https://us06web.zoom.us/j/87256071707?pwd=F7077MJSL1JLNEK7CMXygrHC0hVAlw.1
Meeting ID: 872 5607 1707
Password: 309205

Nov 9th – Saturday
Topic: Zoom Crop #43 - ArtFest Hosted by Dooreen Rousseau - SATURDAY
Time: Nov 9, 2024 10:00 AM Mountain Time (US and Canada)
Link: https://us06web.zoom.us/j/87925186090?pwd=EEPjhi54pyB6YQ3olyaJaYggcGRGxP.1
Meeting ID: 879 2518 6090
Password: 222409

Zoom Crop Information PDF: CLICK HERE

July 12, 2024 - Zoom Crop

WATCH THE REPLAY: CLICK HERE

Here are the times of the demos
1:12:07 - Demo - Page Builders Club House with Tracy Pounds
Here is the PDF link for Tracy's demo with the instructions and products she used: CLICK HERE

3:03:27 - Demo – Infinity Crafts with April Floriant

Thanks so much to everyone who joined and hope to see you all again on Friday, August 9th – from 10:00am to 2:00pm MDT.

July 24/24 Online Class

View the Class Video: Click Here

View the Info PDF: Click Here

Link to purchase the Craft Along Kit: Click Here

April 30/24 Online Class


View the Info PDF: Click Here

Link to purchase the Craft Along Kit: Click Here

December 9/23 Zoom Crop

8 Hour Zoom Crop: Click Here

After Hours Zoom Crop: Click Here

September 27th/23 Online Class


View the Info PDF: Click Here

Link to purchase the Craft Along Kit: Click Here

This website uses cookies to ensure you get the best experience on our website. Learn more

VIP Zoom Crop
Friday January 16th: 6:00pm - Midnight MST
Saturday January 17th: 10:00am - Midnight MST
Hosted by: Simply Stated Design

You will need the ZOOM App on your computer or phone.

Friday Zoom Meeting:
Link: https://us06web.zoom.us/j/81311221698?pwd=gXkeFjnWDekB0nRHohTqwYpTqZPyps.1
Meeting ID: 813 1122 1698
Password: 751404

Saturday Zoom Meeting:
Link: https://us06web.zoom.us/j/87948630680?pwd=ulxwatsEwIEakz6c5fvQ341BIouJ2t.1
Meeting ID: 879 4863 0680
Password: 862986

Zoom Crop Information PDF: CLICK HERE

To purchase the Craft Along Kit: CLICK HERE