


Is it already Back to School time? It sure is and on the blog today we are using the Brother ScanNCut2.  Hey crafters, Nicole here from Nicole Wright Designs and I am excited to start crafting with this awesome machine. This is my first time creating with the Brother ScanNCut2. Let’s start off with a simple cut to make a quick card.
  The Brother ScanNCut2 comes loaded with a great selection of cuts to get you started. I selected the “BACK TO SCHOOL” cut. The large touch screen is awesome and user-friendly. You can adjust the size, cut placement and a lot of other options I will be learning. Select cut and hit the big green play button! BAAM… you are cutting!
  I used some scrap patterned paper and black cardstock to layer a shadow. I adhered the “BACK TO SCHOOL” patterned paper cut to the black cardstock. Then I selected some old school textbook maps. Someone didn’t return their textbook.
 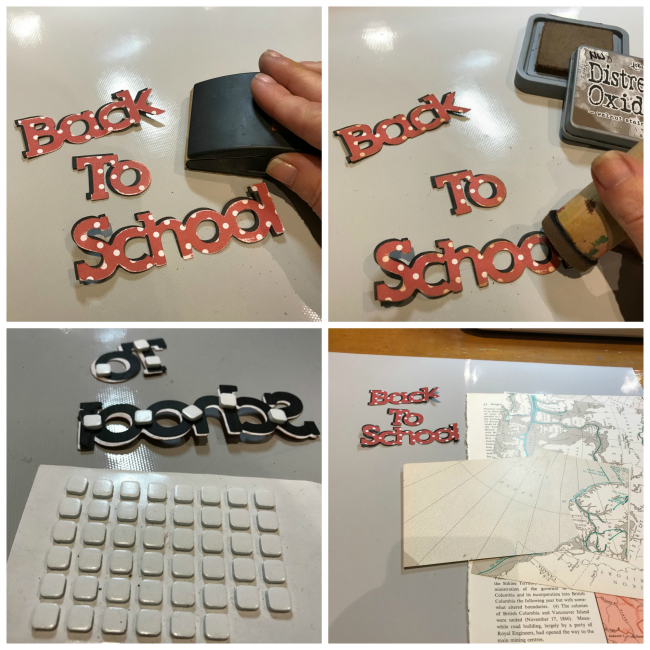 I scuffed up the edges of the pattern paper and added a little Ranger Distress Oxide Ink Walnut Stain. To add dimension… because that’s what I do, I popped the “BACK TO SCHOOL” up with my favourite Scrapbook Adhesives by 3L 3D Foam Squares. The mini ones are perfect.
 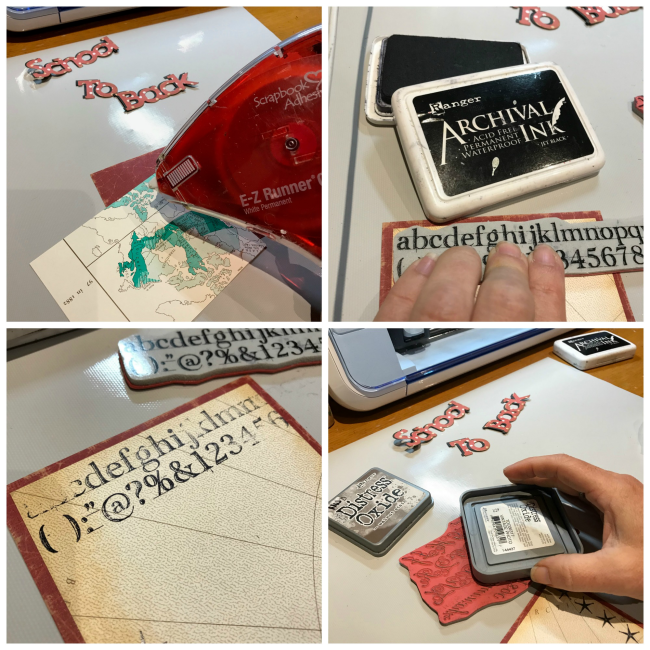 The old textbook atlas is cut to 5”x 3 ¾” to layer. I inked the edges of the map paper with Ranger’s Oxide Ink Walnut Stain. I inked Ranger Archival Jet Black ink to the Stampers Anonymous Typography and stamped without a block. Scary I know but it really adds to that worn look.
  Repeat the again with Ranger Oxide Ink Walnut Stain to create a back layer. The glossy finish of the Atlas paper allows the Oxide Ink to smear a bit. So why not smudge a little. Add some embellishments and pop your Brother ScanNCut2 “BACK TO SCHOOL” sentiment to pull it all together.
 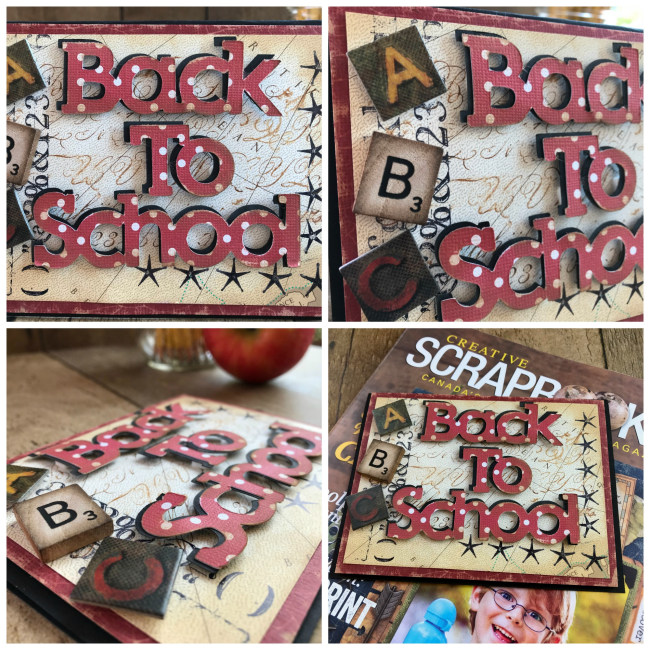 I hope you like my grungy take on this clean cut. Creating this card took me about 20 minutes.
The perfect card for your kids or to welcome your teachers back.  This Brother ScanNCut2 Back to School card is the perfect pairing with the Fall Issue of Creative Scrapbooker Magazine. I am a bit partial to this issue since it’s my layout that made the cover. Looking forward to sharing my journey to learning the Brother ScanNCut2 and focusing on all the creative fun this machine has to offer.
Supplies
Brother Cut N Scan 2
Ranger
Oxide Ink- Walnut Stain
Archival- Jet Black
Scrapbook Adhesives by 3L
EZ- Runner Grand
3D Foam Squares
Stampers Anonymous
Typography
Scrabble pieces
Assorted paper
Have a wonderful Thursday everyone!
To see more of Nicole’s work visit her blog – Nicole Wright Designs
SUBSCRIBE TODAY to Creative Scrapbooker Magazine

