Hello everyone! LeahΒ O’Neil here with you today, continuing with my creative planning blog series where I show you the different ways I am using and decorating my Carpe Diem planners from Simple Stories! If you missed my last post about my wellness planner, you can check that out here! For this post, I am going to be showing you the planner I use for day-to-day planning and scheduling. For more about the setup of this planner, you can check out my most recent blog post with Simple Stories here. Today, I want to show you how I have decorated the front pockets of my Ivory Carpe Diem planner and how I have decorated my monthly calendar pages for May. I am using the Simple Stories Domestic Bliss and Home collections in this planner. The front pockets are set up with a mixture of die cuts, stickers, and a few cards…
Kim Gowdy is on our show today creating stencils using a border punch. Here is the super fun card she designed Featuring products from… Creative Memories Original Border Punch SystemArt Impresssions Rubber stampsRanger distress inkElizabeth Craft Designs dies Scrapbook Adhesives by 3LΒ Grab a coffee and watch as Kim creates this card. https://www.youtube.com/watch?v=WNwNB4CR8go&t=1s Happy Scrapbooking everyone! SUBSCRIBE TODAYΒ to our quarterly publication – delivered right to your door!
Cloud Splash Decorative Paper by Marie Browning for Tombow Make beautiful cloud splash paper for a decorative page in your scrapbook or cut it down for inspiring cards.Materials Tombow Xtreme Tape Runner Tombow Blending Kit Tombow Dual Brush Pen, 555 β Aquamarine Watercolor paper Uncooked rice Instructions Step 1: Cover the Blending Palette from the Blending Kit with ink from the Dual Brush Pen in 555-Aquamarine. Place the palette face down onto the watercolor paper, then lift.Step 2: Dry off the palette with a paper towel. Repeat step 1 to cover the entire piece of watercolor paper. Do this quickly to avoid the splash from drying. If it does dry, just spritz on a little water with the mister to moisten.Step 3: Immediately sprinkle on uncooked rice onto the still wet paper.Step 4: Let dry and brush off the rice. The resulting decorative paper can be used for a scrapbooking…
Hi everyone! I donβt know about you, but I canβt wait for summer to start – the school year is almost over and vacations are right around the corner! Iβve created a cute little mini-album that you can make before your vacation to take with you and use as a travel journal, or, you can make after your trip as a vacation keepsake!This little mini-album is fast and easy to make with minimal supplies and tools, and of course you can customize it to any theme by changing up the papers and embellishments. Itβs also very interactive because of the tabbed insert pages, so kids will love it! And no matter if youβve planned a local road trip or a world-wide adventure, the new Gallivant Collection from Creative Memories is the perfect collection to document your travels with! It features great colors, versatile patterns and awesome retro-style embellishments and stickers!To…
WINNER – congratulations to Cathy Ockermann- this weeks lucky WINNER! I LOVE WEDNESDAYS!!!! We give away something EVERY SINGLE WEDNESDAY to one of our lucky followers!!!!Β It could be you! This week we are giving away an assortment of the VERY HOT Tim Holtz for Ranger Distress Oxide inks! Β YAHOOOOOO To enter to win this contest 1. Visit Ranger on facebook β CLICK HERE β Say hello from Creative Scrapbooker Magazine! 2. Leave a comment right here under this blog post. You have until FridayΒ May 19th Β at midnight to enter! Good luck everyone! SUBSCRIBE TODAYΒ to our quarterly publication – delivered right to your door!
Check out Design Team member Tracy McLennon’s take on our May Sketchy ChallengeSUPPLIES: Close To My Heart patterned paper, ink and cardstock, Creative Memories Custom Circle cutting system, Scrapbook Adhesives by 3L. Tracy used the Creative Memories Custom Circle Cutting system to create all those fun circles.She then adhered everything down using Scrapbook Adhesives by 3l. Here is the sketch she based her layout onWe invite you to participate in our Sketchy Gallery – we want to see your monthly creations – CLICK HERE Get your sketchy on! SUBSCRIBE TODAYΒ to our quarterly publication – delivered right to your door!
Hi crafters, Nicole here from Nicole Wright Designs and I have a fun DIY Tutorial on Journaling with your Sizzix dies.Β Follow me through the process and try some of these fun techniques on your next project! Night Dreamer is my newest pages in my first art journal. Β I know I keep saying how much I am enjoying journaling because it’s true! It all started with my pages I gessoed black. Β At first this was a great idea, then I felt it was a bad idea… then I went with it and I was beyond happy with it. After the pages were painted all black I went back over with white gesso to create a hill effect and road Colouring with various Ranger green distress crayons for shading and lighting. Β The sky has shades of blue and violet.The cityscape is inked with Ranger Distress Oxide ink and run through myΒ Creative…
Winner update – congratulations to the following luck winners! Β THANKYOU to all who participated – we truly appreciate your support! Cheri Turner Kristy Hardy Konnie Kranenburg Jeannie Emond Rebecca Billard We are giving away 5 – 100$ SURPRISE paper crafting boxes!!!! You need to win one! Here is what you need to do 1. Follow Creative Scrapbooker Magazine on Instagram or TWITTER CLICK HERE for Instagram CLICK HERE for Twitter 2. To enter to win – leave a comment right here under this blog post! Contest closes – Tuesday May 9th at midnight! Good luck everyone! SUBSCRIBE TODAYΒ to our quarterly publication – delivered right to your door!
Happy National Scrapbook Day! Kim here with a layout share using products from Wild Whisper Designs, Ranger Inks, Southern Ridge Trading Company and Scrapbook Adhesives by 3L. I loved the βAdventure Collectionβ from Wild Whisper Designs from the moment I started to see layouts being created with it shared online. It is so well suited for outdoorsy photos! I paired the papers up with some bear photos I had from a few years back! I am really happy with the finished result! I designed and cut my title using my electronic cutting machine and was thrilled that by chance it lined up perfectly with the design of the paper I placed behind for contrastβ¦giving it a bit more visual texture! My journaling was done using a Ranger Ink Dylusions paint pen β you should try them out if you havenβtβ¦I LOVE them! My bear and tree elements are from Southern…
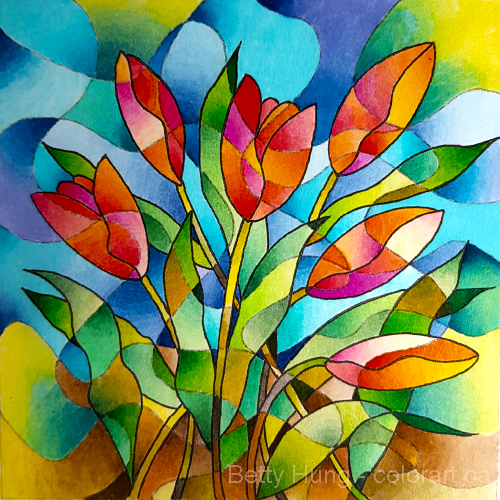
Best part of each month is a FREE COLOURING card designed by the SUPER talented Betty Hung! Here is May’s card – all ready for you to start colouring! CLICK HERE TO DOWNLOAD your FREE Colouring card and start colouring today. Here is Betty’s finished project. Betty coloured the project using Tombow Dual Brush pens. The results are simply stunning! Visit Betty’s Β blog – Color Art – for more colouring inspirationΒ SUBSCRIBE TODAYΒ to our quarterly publication – delivered right to your door