Hello scrappy friends! Tracy McLennon here, and today I have a little sparkly layout to share featuring Simple Stories Hey Crafty Girl Collection and Scrapbook Adhesives by 3LΒ Here are all of the details. I started my creation by taking a piece of Creative Scrapbooker Super Stock and cutting it to 11.5×11.5. Next, I took my Scrapbook Adhesives by 3L Home Hobby by 3L Extreme Double-Sided 1/4″Adhesive and edge by edge added a strip. Add one strip at a time, and add the coordinating Elizabeth Craft Designs Silk MiroFine Glitter one at a time. Adhere this layer to a sheet of black cardstock. I cut 2 pieces from the Hey Crafty Girl Collection by Simple Stories patterned paper that were 9×9 and adhere to the background. Add a striped strip of patterned paper that is 1.5×10.5. Mat the 4×6 photo in white cardstock and add Scrapbook Adhesives by 3L Creative…
Hey Creative Scrapbooker Fans! It has been snowy and wet here on the West Coast of Canada and I have already started counting down the days until Spring arrives. So for todayβs project, Iβve created this fun and bright The Journey is the Start Card. To create my card, Iβve used stamps, inks and Paints from Ranger Ink , Β Super Stock from Creative Scrapbooker Magazine, dies from Elizabeth Craft Designs, embossing powder from Emerald Creek Craft Supplies and adhesive from Scrapbook Adhesives by 3L. Youβll want to grab a cup of your favourite beverage and learn how to recreate my card at home. To start, die cut a 4β Stitched Rectangle from Elizabeth Craft Designs out of Super Stock from Creative Scrapbooker Magazine. Next, youβll need the Honeycomb Small Dylusions Stencil from Ranger Ink. Place the stencil on the rectangle piece as desired and use a blending tool with foam…
Hello everyone! Itβs Kerry Engel, here today to share with you an adorable card that is just begging to be touched. Between the embossing, stenciling and flocking this card is full of texture-therapy; for the maker and the receiver. Cards for any occasion are my favorite ones to keep in my stash. This cute little die-cut owl could be used on a multitude of occasions and I find his tummy is just the right size to hold a sentiment. My favourite trick when putting together more detailed die cut items is to use 3D Foam SquaresΒ under key areas. I used the Scrapbook Adhesives by 3L 3D Foam Squares to raise my owlβs head up and away from his body. Therm O Web Deco Foil Flock Transfer Sheets cut like butter and emboss like a boss. To create this adorable Owl I used the Therm O Web Deco Foil Flock Transfer…
Hey there everyone! We want YOU to join the Creative Scrapbooker Magazine Sketchy Challenge Facebook Group!Β Each month the fabulous Kerry Engel designs a sketch – posts it – you create a project based on the sketch – post it – THEN WE ALL CAN LOVE IT!!!!Β It is as easy as that!Β CLICK HERE to join! Here is the Dec Sketch Here is Kerry’s take on the Dec Sketch Kerry’s layout was designed using the following products Impression Obsession stamps Elizabeth Craft Designs Dies Ranger Tim Holtz Distress Oxide Inks Creative Scrapbooker Super Stock Scrapbook Adhesives by 3L Chameleon Color Tone Pens We look forward to seeing how you use our monthly sketches from the Creative Scrapbooker Sketchy Challenge Facebook Group! Happy Scrapbooking SUBSCRIBE TODAY! to Creative Scrapbooker Magazine
Hey Creative Scrapbooker Fans! I’m excited to be back on the blog today sharing with you a fun winter wall hanging. The jumping-off point for my project is the Canadian Winter Collection from Wild Whisper Designs, dies from Elizabeth Craft Designs as well as products from Ranger Ink and Scrapbook Adhesives by 3L to create my We Have Fire In Our Hearts Wall Hanging. Grab a cup of your favourite winter beverage and I will walk you through on how you can recreate my wall hanging at home. To start, youβll need the stick paper out of the Canadian Winter Paper Pack from Wild Whisper Designs. Die cut the 4 Β½β Stitched Fishtail from Elizabeth Craft Designs out of the paper. Ink the edges of the fishtail using Black Soot Distress Ink and a blending tool with foam from Ranger Ink. Next, youβll need the hat & toque paper out…
Let the PARTY BEGIN! HO HO HO! How the contest works. Each day for 12 days in aΒ row we will be sharing four or five prize packages with you. Β Leave a message under the blog postΒ forΒ each post in order to be entered for all 58Β Prize Packages. Visit the prize sponsor on Facebook (LIKE THEIR PAGE) and say hello from Creative Scrapbooker Magazine or CSM. NOTE do not use the same comment every time you post on Facebook β Facebook thinks you are spam and may block you. Please take the time to visit our sponsors. Without our amazing sponsors, this contest would not be possible! Names will be drawn randomly and you can win more than once if you enter your name each and every day! Link to enter to win today’s prize packages is at the bottom of the page. Winners will be announced onΒ Dec 24th. Just in time…
Hey Creative Scrapbooker Fans! Halloween is only 3 days away and I’m excited to be back on the blog sharing with you my altered candle holder perfect to hang in any area of your home. The jumping-off point for my project was the collection Halloween Night from Wild Whisper Ink and blending tool by Ranger Dies from Elizabeth Craft Designs And adhesive from Scrapbook Adhesives by 3L I was able to create this Trick or Treat Altered Candle Holder. Youβll want to grab a cup of your favourite Halloween beverage as I share with you how to recreate my project at home. To start, youβll need a candle holder that is 4 Β½β in diameter. Next, youβll need to pick two border strips off the bottom of two patterned papers out of the Halloween Night Paper Pack from Wild Whisper Designs. Cut one of the border strips down to…
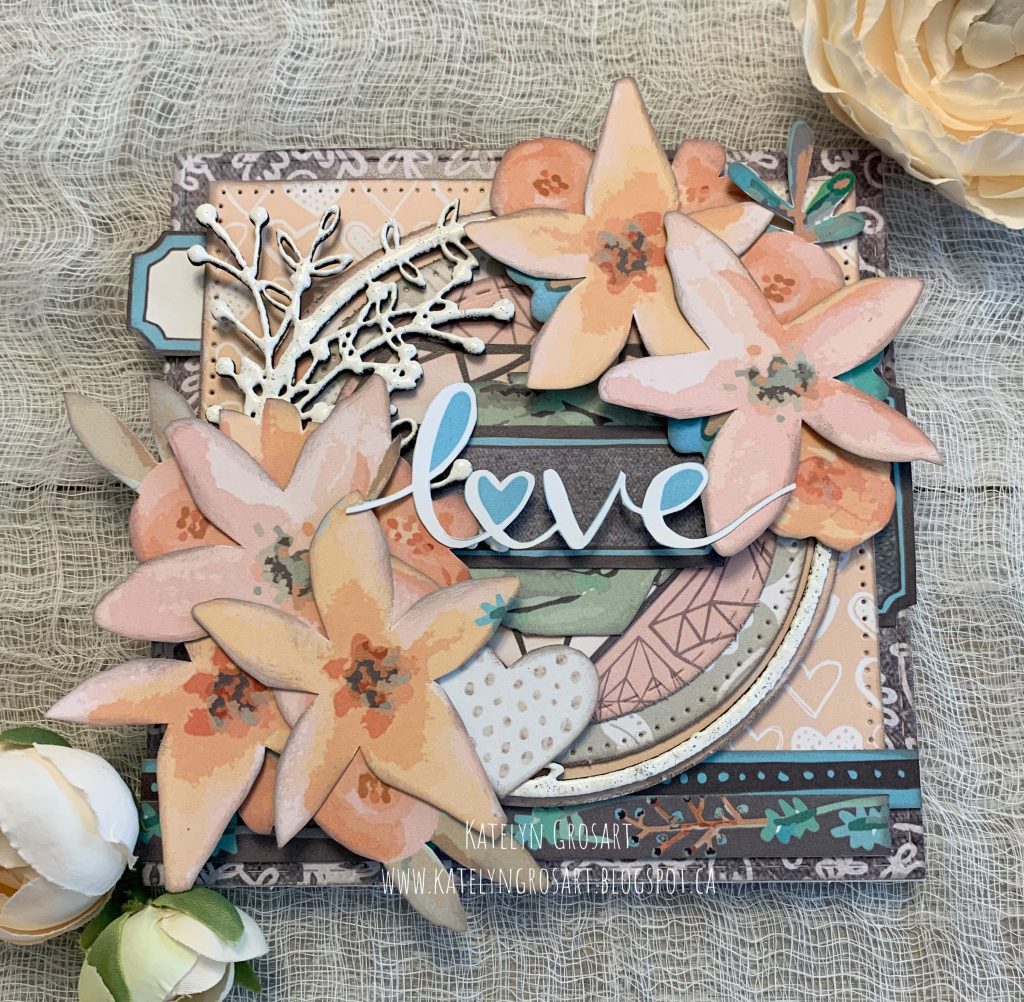
Hey Creative Scrapbooker Fans! Katelyn Grosart here today on the Creative Scrapbooker Magazine blog.Β I’m excited to be back sharing with you my pretty card perfect for an anniversary or wedding. The jumping off point for my project was the Forever & Always collection and embellishments from Wild Whisper Designs. Which I combined with some adhesive from Scrapbook Adhesives by 3L, dies from Elizabeth Craft Designs, Β chipboard from Southern Ridge Trading Company, embossing powder from Emerald Creek Craft Supplies, Super Stock from Creative Scrapbooker Magazine and ink from Ranger,Β I was able to create this pretty Love Card. Youβll want to grab a cup of your favourite Summer beverage as I share with you how to recreate my card. Fussy cut four large flowers and ten small/medium sized flowers out of the flower paper from the Forever & Always Collection from Wild Whisper. Ink the edges of all of the flowers…
Kerry Engel is on our latest web show creating gorgeous mixed media backgrounds and embellishments for tags, cards, art journal pages, scrapbook layouts and more.Β Check it out. https://www.youtube.com/watch?v=2jF1NuI30dk SUPPLIES Brea Reese Acrylic Paper Brea Reese Watercolors Brea Reese Heavy Body Acrylic Paints Clearsnap ColorBox Archival Ink Elizabeth Craft Designs Stamps Brother PT-H200BP Craft Labeller and Decorative Ribbon Glue Dots Adhesives Be sure to follow Creative Scrapbooker Magazine on YouTube! Do not miss a single video! CLICK HERE Happy Scrapbooking Everyone!Subscribe today to Creative Scrapbooker Magazine
Hello! Kim here again today! Happy June and official countdown to summer! Did you notice that our June Sketchy Challenge was revealed? I LOVE these monthly sketches, though I rarely do not get to them until a month or two later, but THAT my friends is perfectly OK! The thing is…sketches do not expire! They will patiently wait for YOU, so relax and work with them on YOUR schedule, not someone elseβs! Kerry Engel has been designing our monthly sketches; and continues to come up with great ideas! This monthβs sketch is a double page layout and we are all excited to see what stories you tell! I am sorry to say…my June sketch inspired layout is a 12×12 layout. I canβt even tell you the last time I did a double page layout [probably since losing horizontal space to scrapbooking product!], so without guilt, I adapted it to what…