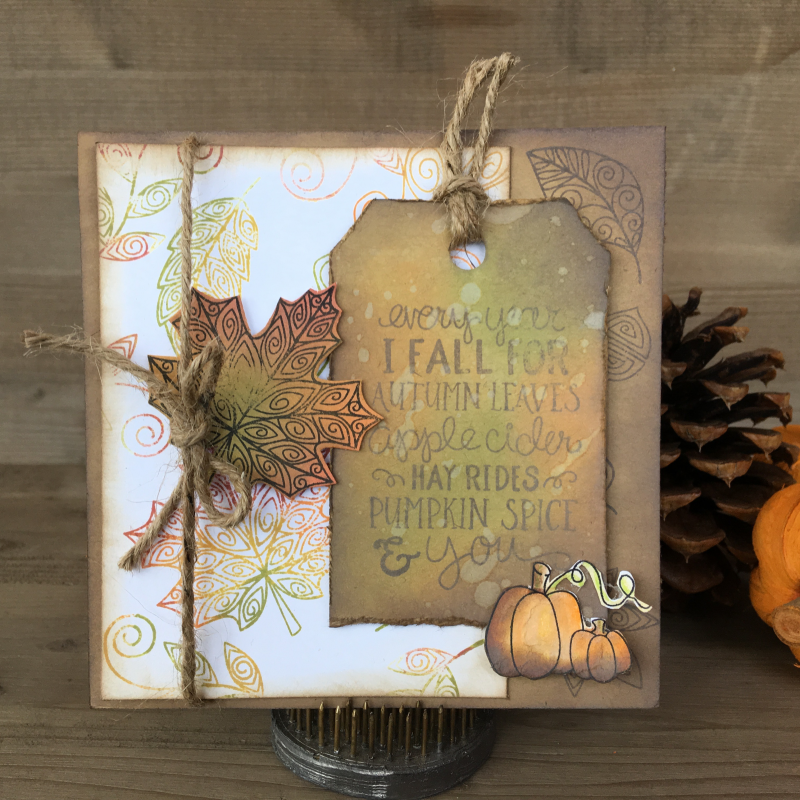
Nicole here today on the Creative Scrapbooker Magazine blog sharing my jumpstart on fall – this gorgeous fall card. OK, I know, I know we are only half way through summer and already Iβm blogging fall leaves! Β I really couldn’t help myself. Β I mean… you know me!Β This week I am blogging forΒ XyronΒ whereΒ Newton’s NookΒ are teaming up for some… AWESOMENESS! Β I thought I would share my simple card here too. Xyron Xyron just happens to be a sponsor of the Great Canadian Scrapbook Carnivals in Edmonton and Calgary this fall! A huge thank you to this awesome company for sponsoring. This event would not be possible without our amazing sponsors! Registration is open – CLICK HERE – you won’t want to miss out! Today’s Project I love fall leaves so of course I had to go for these gorgeous leafy stamps. Β Can you imagine these embossed or in an art journal!…
Hello, Nicole here and I am so excited to share my new journal pages using Stabilo.Β I was sent a set of Β Woody 3 in 1 pencils to create with.Β These are new to me so I was very curious how they would handle my love of watercoloring.Β They far surpassed my expectations!Β They are smooth to put on these old pages, creamy enough to blend and donβt washout when watercoloring.Β Check out my quick and easy tutorial for stamping and watercoloring with Stabilo Woody 3 in 1 pencils.I prepared my old book pages with Rangerβs Clear Gesso.Β Once dry I stamped the Garden Flower stamps randomly then started adding colour with the Stabilo Woody pencils.Β You can easily move the colour around by smearing with your fingers.This is my first time so I wanted to try the pencils in different ways.Β I tried blending and they blend beautifully.Β Watercoloring…
Hi crafters, Nicole here from Nicole Wright Designs and I have a fun DIY Tutorial on Journaling with your Sizzix dies.Β Follow me through the process and try some of these fun techniques on your next project! Night Dreamer is my newest pages in my first art journal. Β I know I keep saying how much I am enjoying journaling because it’s true! It all started with my pages I gessoed black. Β At first this was a great idea, then I felt it was a bad idea… then I went with it and I was beyond happy with it. After the pages were painted all black I went back over with white gesso to create a hill effect and road Colouring with various Ranger green distress crayons for shading and lighting. Β The sky has shades of blue and violet.The cityscape is inked with Ranger Distress Oxide ink and run through myΒ Creative…
How you Beanβ¦ Nicole here and I am sharing my Art Journal pages in my 115 year old book!Β ACKβ¦ I know itβs old but it is so much fun.Β Not everything I get in the mail is something I would normally create with. Β That doesn’t mean I don’t enjoy the challenge of making this my own style. Β It creatively opens my mind up and pushes my limits. I picked this pretty spring paper Lawn FawnΒ Perfectly Plaid Rainbow Petite PaperΒ pack. Β I do love plaid. Β I stamped on the pattern paper and wait for it… fussy cut. All those jelly’s stamped and yes, more fussy cutting. Β I wanted to layer and stack the jars. Β Trimming the beans so they spill the way the jars tilt. ACK… trying the new RangerΒ Distress Oxide InkΒ by watercoloring the jelly’s. Β Love them!!! Β Time to make this easy and myΒ XyronΒ Create a StickerΒ to adhere all these jelly…
Creating a Background with Ranger Hey Creative Scrapbookers, Nicole here with you for Tuesday with the Team.Β Have you got your copy of the Spring Issue of Creative Scrapbooker Magazine?Β This card was featured in the Technique Tasters column pages 66-67.Β Here, I have a more detailed look at how to create a dynamic background using Ranger Distress Crayons.Β Check out the steps below and get your Ranger Distress products ready. Brush a thin layer of Rangerβs White Gesso onto a 2 ΒΎβ x 5 ΒΎβ piece of cream cardstock and set aside to dry.Β For the background layer prep a 5 ΒΎβ x 5 ΒΎβ piece of watercolor paper.Β Spray with water to help the Distress Spray Stain to blend. Spray water over the distress spray stain again and heat dry.Β Add distress ink and blend.Β This gives the background a rich look.Β Flick water over the inked paper…
Hoppy Easter to you! Β Easter is just around the corner and I made a rustic little framed bunny card forΒ Xyron. Β How can you not love these mossy little bunnies! Β The XyronΒ Create a StickerΒ works wonders for attaching the moss. TheΒ Ornate Frame 2Β die is the perfect frame for this adorable bunny. Β Applying the RangerΒ Emboss ItΒ dauber makes for fast application. Β Sprinkle with Emerald Creek Craft SuppliesΒ Oil Rubbed BronzeΒ embossing powder then rub the edges clean for a rustic worn look. Exposing the edges allows to some inking with RangerΒ Brushed CorduroyΒ distress ink. Β TheΒ Create a StickerΒ is the perfect size for those smaller die cuts to apply adhesive effortlessly and without the sticky mess for applying the moss. I love having moss in my stash. Β Push the moss into place and trim off the moss around the bunny. Β The frame is bigger so I used theΒ Creative StationΒ with theΒ 5″ cartridge refillΒ running it through face up. Β Rub the frame…
Wouldn’t we all like one of these sitting on the table. What a pretty specimen this would make. Today I am sharing a tutorial forΒ SizzixΒ using theΒ Flower Garden and Mini Bouquet. Β You can get the Framelits to go with theΒ Mini BouquetΒ andΒ Flower GardenΒ Stamps. Β No fussy cutting! Β Well I was going through my “Library” of dies looking for theΒ ApothecaryΒ die and I found theΒ Bell Jar w/PedestalΒ first…so it wins! The best part about these stamps… no cutting! Β Stamp and line up the Framelit. Β Every flower needs a butterfly and theΒ Butterfly Duo w/Texture FadeΒ is exceptional. TheΒ Magrnetic PlatformΒ is essential for the Framelits and Thinlits. Β It helps to use a little washi to hold the famelits in place so it won’t shift. Β Plastic packaging is perfect for the Bell Jar glass portion. I used the new Mixed Media #8 Distress Tags with theΒ Flourish Texture Fade. Β Once the tag is embossed I covered the tag with gesso. Β While that…
Hey everyone, Nicole over at Nicole Wright Designs and I am sharing a creative challenge I faceβ¦ a simple clean card.Β I always want to throw all my inks, stamps, die cuts, stencils and embellishments at them.Β This card is so clean and basic thereβs barely even a tutorial.Β That is great if you want to make some quick holiday cards or gift tags.Β Take the stress out of the holidays and keep it simple. The key to making these quick with a little bling are the Ranger Metal Foil Tape Sheets. I cut the Woodlands, Holiday Words Block and Holiday Words Script Thinlits with the Foil Sheets. Using the Magnetic Platorm for the Thinlits makes cutting easy as the dies wonβt shift. 2. Simply position and stick the Woodlands Metal Foil Tree onto your cardstock. No glue required. Mount your treed layerΒ with Scrapbook Adhesives by 3L 3D Foam…
Hey Crafters, NicoleΒ Wright here and Iβm back to share my love for industrial crafting.Β With the new Sizzix Β Gears available I decided to haul out my SizzixΒ Gadget Gears die (I believe the first Sizzix die I ever bought) and have a little fun experimenting with my embossing powders and distress crayons. I cut a set of Gadget Gears with Sizzix Little Sizzles White Mat Board.Β I heat embossed a coat of Emerald Creek Craft SuppliesΒ Era Hammered Metal Embossing Powder.Β This thick powder leaves open spots to add color.Β I wanted to see if the distress crayons would work to create a weathered patina on the gears. On the set of gears I used Ranger distress crayons vintage photo, mermaid lagoon, peacock feathers and peeled paint.Β The distress crayons fill in the areas the thick embossing powders donβt.Β Once the colors are filled in I used a baby wipe to remove…
Happy first day of Fall!Β Nicole here from Nicole Wright Designs and Iβm excited to share my most favorite time of yearβ¦ Fall! I just got all my Sizzix dies to play with and I went for the Dashing Deer first knowing I was somehow going to create a fall project. Β Well I usually have some idea of what I may create. Β This one needed lots of leaves and burlap. Onto the fun! I decided to layer up the antlers with the mat board cut 2 times and a layer of SizzixΒ Leather Paper. Β I cut the head and upper body with some scrap Core paper. Β For the leaves I made my own paper using watercolor paper. I grabbed my Ranger Distress Spray Stains peeled paint, carved pumpkin and fossilized amber. Β Spritz and spray.Β Apply matching distress inks to intensify the colour. Now that the paper is dry I can cut…
