Tag

scrapbook adhesives by 3L

Browsing

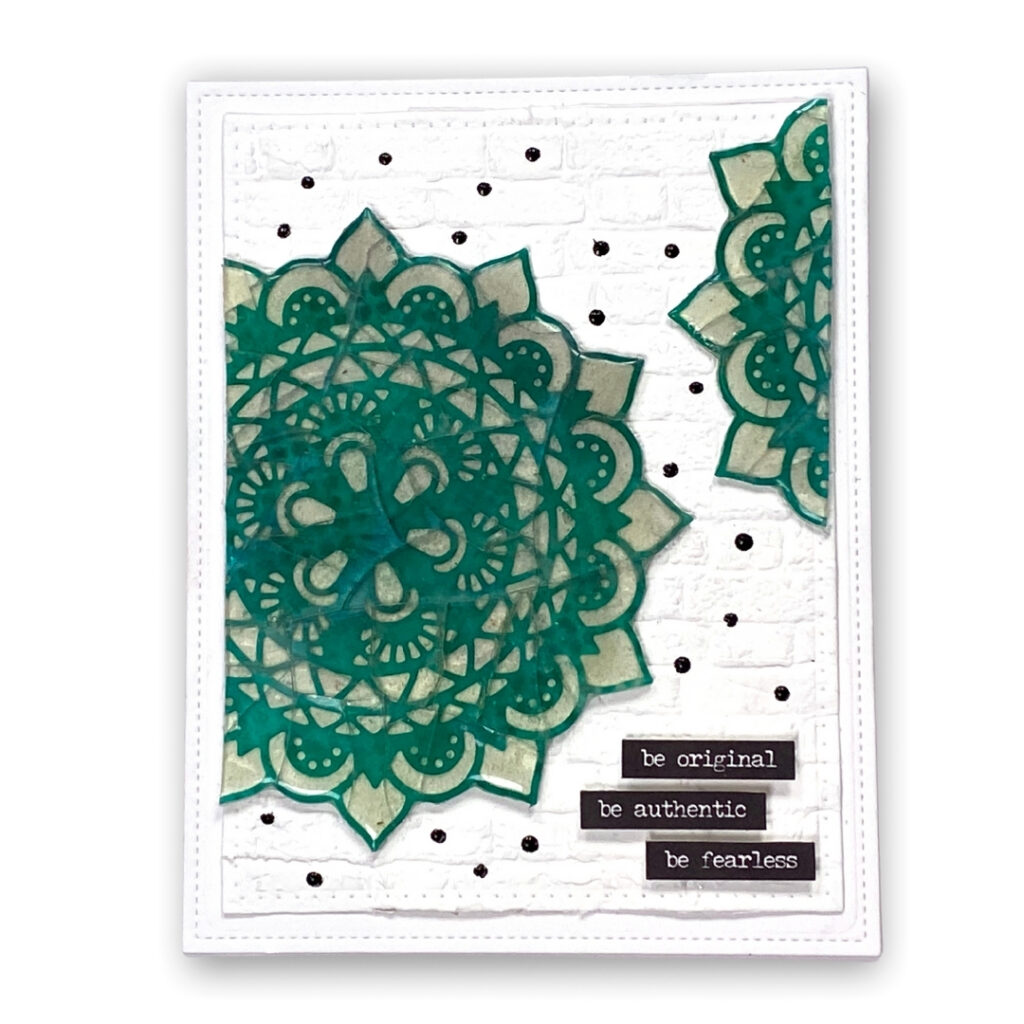
If you are like me and find watching embossing powder change to liquid as it heats up oddly satisfying, this is the technique for you! To create this card first cut out a base from Ranger Simon Hurley Create Stark White Cardstock. I used an Elizabeth Craft Designs Stitched Rectangle die.Β  On a second piece of white cardstock, emboss the brick wall using a Tim Holtz Embossing Folder. Once embossed cut out the brickwall using a slightly small stitched rectangle die from the sameΒ  Elizabeth Craft Designs die set.Β  Adhere the brick wall in the center of the larger stitched rectangle using Scrapbook Adhesives by 3L E-Z Squares. Set aside. Next, on a piece of white cardstock, lay a Stampers Anonymous Tim Holtz stencil down. Apply Ranger Simon Hurley Create ink with a Mini Blending Tool. Lift up the stencil and gently spread the ink filling in the white spots.…
Using watercolor pencils and a waterbrush is the absolute easiest way to color detailed stamped images. Adding shading and highlights using this technique has never been easier! I like to use a fine tip waterbrush pen and I dip it in water rather than filling it up with water.Β  So really you could use a fine tip paintbrush instead! Here is the card I created. I am SERIOUSLY in love with this stamp set from Heartfelt Creations. Cottages are super trendy right now in the crafting world and this is one of my favourite designs. To create this card… Using the Heartfelt Creations Countryside Cottage stamp, stamp onto a piece of watercolor paper. I used Ranger Archival ink so that the ink doesn’t run when I add water. Stamp the image using a stamping platform.Β  Do not remove the stamp from the platform as you will re-stamp the image once…

Hey Creative Scrapbooker Fans! For today’s blog post, I’m sharing with you how to create a cute Happy Day Wall Hanging using the Bunnies & Blooms Collection from Simple Stories.Β  To create my wall hanging, I’ve also used a variety of products from Ranger Ink, Dies from Elizabeth Craft Designs, and adhesive from Scrapbook Adhesives by 3L. You’ll want to grab a cup of your favourite beverage and learn how to recreate my wall hanging at home. To start, you’ll need the Scattering Seeds paper out of the Bunnies & Blooms Paper Pack from Simple Stories. Die cut a 4 1/2” Stitched Indented Rectangle from Elizabeth Craft Designs out of the patterned paper. Ink the edges of the paper using Kitsch Flamingo Distress Ink and a blending tool with foam from Ranger Ink. You’ll need the In Full Bloom Paper out of the Bunnies & Blooms Paper Pack from Simple…

Hello crafty friends! Tracy here and today I have a pretty little card to share today featuring Gateway Dies and the Cascading Wisteria collection from Heartfelt Creations. Here are all of the details. First I used my Heartfelt Creations Gateway dies to cut my layers from white and Luxe Gold Cardstock. To create my card base I folded a piece of white cardstock in half and die cut it using the largest die from the set, making sure to keep the card’s fold intact. I stamped and die cut all of the Wisteria images using Ranger Archival Ink- Coffee onto white cardstock, and added colour to the branches and flowers using Zig Clean Color Markers and a waterbrush. I added colour to the leaves using Ranger Distress Oxide Ink andΒ  Heartfelt Creations Stack and Store Daubers. I shaped all of the flowers and leaves slightly using my shaping tool and…

First off, I bought this stamp set from Stampers Anonymous awhile ago and just haven’t had the chance to play with it.Β  I finally pulled it out the other night and started to design with it.Β  I had a smile on my face the entire time. How adorable are those little guys? Am I right or what?! LOLOL! Great job Tim Holtz! I ended up creating a number of little tags that I love! Here are the basic steps to create the tags 1. Using a Scrapbook.com Nesting Tag die and reinforcement circle, cut out a tag from a piece of Creative Scrapbooker Super Stock. 2. Place your tag in your stamp positioner along with the little bunny stamp. 3. Using a post-it note, cover up the sentiment on the bottom of the stamp so it doesn’t stamp on the tag. 4. Ink the stamp with Ranger Archival ink and…

Hey Creative Scrapbooker Fans! Katelyn Grosart here today sharing with you how to create a little boy birthday card using the Welcome Baby Boy Collection from Echo Park Paper Co. To create my card, I’ve also used a variety of products from Ranger Ink, Dies from Elizabeth Craft Designs, Super Stock from Creative Scrapbooker Magazine and adhesive from Scrapbook Adhesives by 3L. You’ll want to grab a cup of your favourite beverage and learn how to recreate my card at home. To start, you’ll need the Little One Paper out of the Welcome Baby Boy Paper Pack from Echo Park Paper. Die cut a 4” Stitched Rounded Rectangle from Elizabeth Craft Designs out of the patterned paper. Ink the edges of the paper using Chipped Sapphire Distress Ink and a blending tool with foam from Ranger Ink. Next, you’ll need the It’s a Boy Paper out of the Welcome Baby…

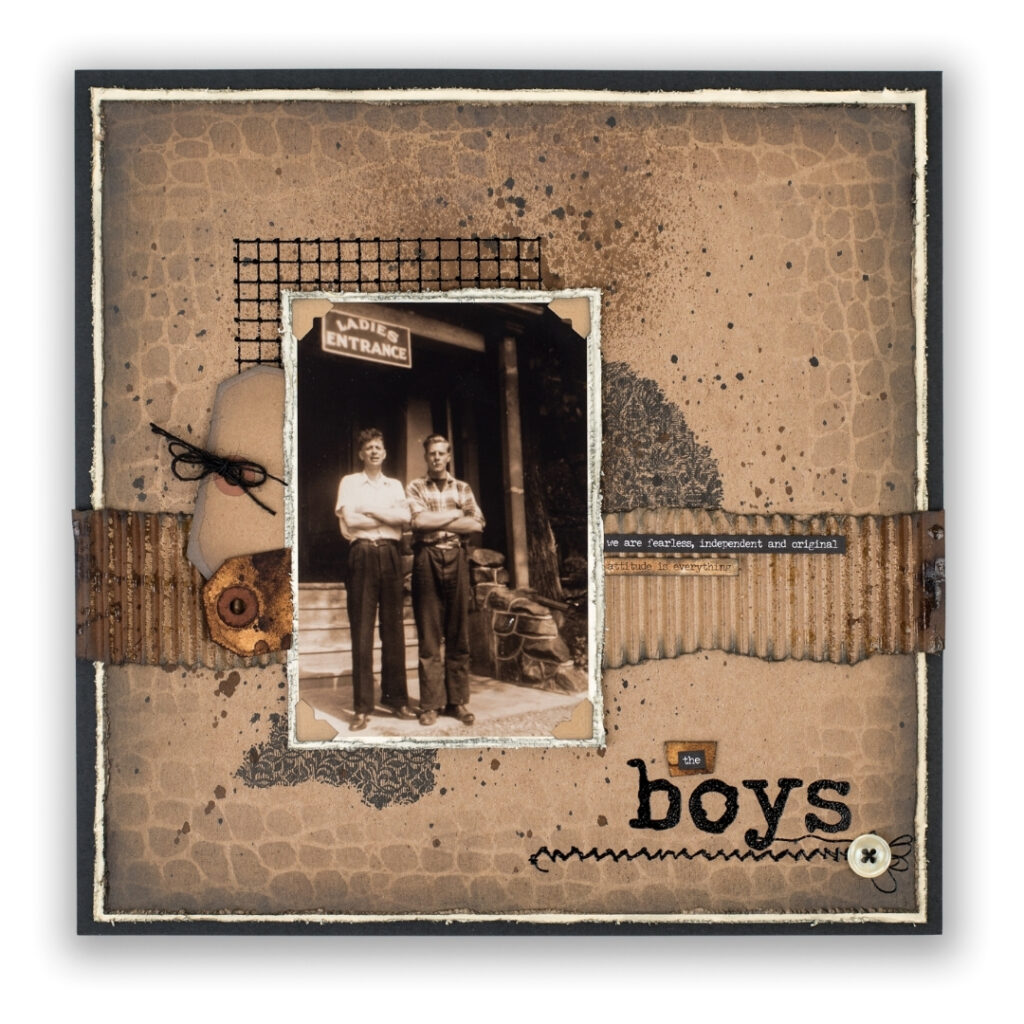
What a fabulous layout designed by Tracy McLennon using those old photos that often scare us. Nobody wants to wreck these precious memories. The answer – MAKE COPIES and scrapbook them! WIN-WIN! I love all the Ranger Distress inks and sprays she allowing this photo to take center stage.Β  Tracy used a variety of Stampers Anonymous stamps including the Wendy Vecchi Off the Grid Background stamp Β AND the Stampers Anonymous Tim Holtz Tapestry Stamp set to create layers on the background. She also used the Stampers Anonymous Tim Holtz Crocodile Layering Stencil to create the design you see on the outside frame of the background.Β  LOVE IT! The journaling was created using stickers from the Tim Holtz Idea-ology Small Talk Stickers Booklet. For even more of a vintage feel, Tracy added Scrapbook Adhesives by 3L Creative Photo Corners to her heritage photo as the perfect little accent. Make copies of…

WINNER – Nancy Miner!!!! Congratulations! Hello, Why Not Win Wednesday!!!!!!Β  YAHOOOO!!!!!!Β  We LOVE WEDNESDAY! TODAY is a fabulous day to enter to win win win …this HUGE prize package from our friends over at Prize Package will include: E-Z Squares Refill 3D Foam Circles White 236 pcs 3D Foam Strips 72pcs E-Z Runner Ultra Refillable Dispenser E-Z Runner Micro Strips Refill E-Z Runner Petite Permanent Dots 26ft Adhesive Lines 200pcs Metallic Transfer Foil Sheets Variety 6×12 5pcs 3D Foam Squares White Mix – 217 pcs Creative Photo Corners Variety Pack 72 pcs Crafty Power Tape Built-in dispenser 81ft Keepsakes Envelopes – 10 asst’d Adhesive Sheets – 4×6” – 10 Sheets Crafty Foam Tape 108ft Be sure to show Scrapbook Adhesives by 3L some love for this fabulous prize package! 1. Follow Scrapbook Adhesives by 3L on Instagram – CLICK HERE 2. CLICK HERE to enter your name! You have until…

Hey Creative Scrapbooker Fans! For today’s blog post, I’m sharing with you my Be Mine Treat Bag perfect for putting treats in for Valentine’s Day. To create my treat bag, I’ve used a variety of products from Ranger Ink, Dies from Elizabeth Craft Designs, Stamps from Wild Whisper Designs, Super Stock Cardstock from Creative Scrapbooker Magazine, and adhesive from Scrapbook Adhesives by 3L. You’ll want to grab a cup of your favourite beverage and learn how to recreate my treat bag at home. To start, you’ll need a treat bag. Ink the edges of the treat bags using Walnut Stain Distress Ink and a Blending Tool with Foam from Ranger Ink. Choose two papers out of Dina Wakley’s Collage Collective Book from Ranger Ink. Die cut a 3” Stitched Rounded Rectangle from Elizabeth Craft Designs out of one of the papers. Die cut a 2 ½” Stitched Rounded Rectangle from…

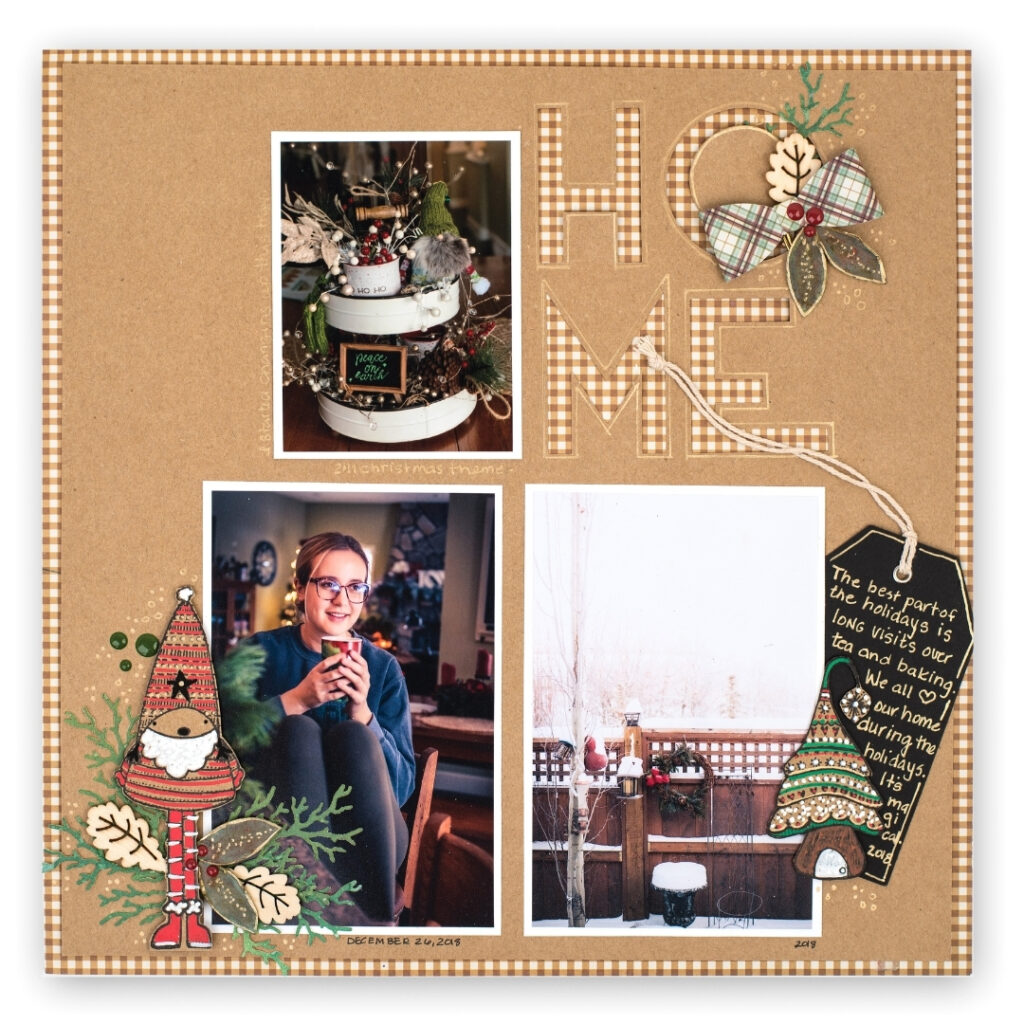
This holiday season GNOMES were HOT!!!!! You could find them everywhere!!! We fell in love with these gorgeous Nordic Gnome stamps by Impression Obsession. How adorable! Check out Kerry Engel’s layout featuring these gorgeous little designs. Kerry also used patterned paper and embellishments from the Simple Stories Winter Farm House collection. Tags and wood laser embellishments from MultiCraft Forever in Time. And she adhered everything down using a variety of adhesives by Scrapbook Adhesives by 3L.Beautiful layout Kerry! Happy Friday everyone!

January 28/26 Online Class

View the Info PDF: Click Here

Link to purchase the Craft Along Kit: Click Here

Recap Video Click Here

February 15th/25

WATCH THE REPLAY: CLICK HERE

Zoom Crop Information PDF: CLICK HERE

FREE Layout Template Guide: CLICK HERE

VIP Zoom Crop

Friday January 17th Zoom Meeting:
Link to replay: CLICK HERE

Saturday January 18th Zoom Meeting:
Link to replay: CLICK HERE

December 30/24 Online Class

CLICK HERE for the Link for Your Crafty Homework

This includes the eBook and printable materials for the class.
Please note: You’ll need to provide your email address, as Nadine Milton will send the information directly to you.

CLICK HERE for the Link for the Information PDF

This includes the supply list for this class.

VIP Zoom Crop
Friday November 8th: 7:00pm - 10:00pm MST
Saturday November 9th: 10:00am - 10:00pm MST

You will need the ZOOM App on your computer or phone.

Nov 8th - Friday Night
Topic: Zoom Crop #43 - ArtFest hosted by Dooreen Rousseau - FRIDAY NIGHT!
Time: Nov 8, 2024 07:00 PM Mountain Time (US and Canada)
Link: https://us06web.zoom.us/j/87256071707?pwd=F7077MJSL1JLNEK7CMXygrHC0hVAlw.1
Meeting ID: 872 5607 1707
Password: 309205

Nov 9th – Saturday
Topic: Zoom Crop #43 - ArtFest Hosted by Dooreen Rousseau - SATURDAY
Time: Nov 9, 2024 10:00 AM Mountain Time (US and Canada)
Link: https://us06web.zoom.us/j/87925186090?pwd=EEPjhi54pyB6YQ3olyaJaYggcGRGxP.1
Meeting ID: 879 2518 6090
Password: 222409

Zoom Crop Information PDF: CLICK HERE

July 12, 2024 - Zoom Crop

WATCH THE REPLAY: CLICK HERE

Here are the times of the demos
1:12:07 - Demo - Page Builders Club House with Tracy Pounds
Here is the PDF link for Tracy's demo with the instructions and products she used: CLICK HERE

3:03:27 - Demo – Infinity Crafts with April Floriant

Thanks so much to everyone who joined and hope to see you all again on Friday, August 9th – from 10:00am to 2:00pm MDT.

July 24/24 Online Class

View the Class Video: Click Here

View the Info PDF: Click Here

Link to purchase the Craft Along Kit: Click Here

April 30/24 Online Class


View the Info PDF: Click Here

Link to purchase the Craft Along Kit: Click Here

December 9/23 Zoom Crop

8 Hour Zoom Crop: Click Here

After Hours Zoom Crop: Click Here

September 27th/23 Online Class


View the Info PDF: Click Here

Link to purchase the Craft Along Kit: Click Here

This website uses cookies to ensure you get the best experience on our website. Learn more

VIP Zoom Crop
Friday January 16th: 6:00pm - Midnight MST
Saturday January 17th: 10:00am - Midnight MST
Hosted by: Simply Stated Design

You will need the ZOOM App on your computer or phone.

Friday Zoom Meeting:
Link: https://us06web.zoom.us/j/81311221698?pwd=gXkeFjnWDekB0nRHohTqwYpTqZPyps.1
Meeting ID: 813 1122 1698
Password: 751404

Saturday Zoom Meeting:
Link: https://us06web.zoom.us/j/87948630680?pwd=ulxwatsEwIEakz6c5fvQ341BIouJ2t.1
Meeting ID: 879 4863 0680
Password: 862986

Zoom Crop Information PDF: CLICK HERE

To purchase the Craft Along Kit: CLICK HERE